Machine seams are divided into connecting, edge and finishing seams. In turn, each of these main types of machine seams has its own classification. For example, a connecting seam can be a topstitch, an overstitch, an overlay, etc. If you need to know how to perform a particular type of seam for labor lessons, or simply need a table of machine seams for self-development, then you can use the information in this article. Please note that machine stitching and machine stitching are different concepts. A machine seam refers to a method of joining or finishing the edge of a fabric, and a machine stitch is a method, a pattern for forming a stitch with a sewing machine.
In this video you will see what stitches a sewing machine can make. Subscribe to our channel, you will learn a lot of useful tips.
Connecting machine seams
Stitch seam
This machine seam is used when connecting shoulder and side sections, connecting a bodice with a skirt, sewing down sleeve sections, as well as when sewing a sleeve into an armhole, etc. The parts are folded right sides together, basted and stitched, stepping back from the cut to the width of the seam.
Wet-heat treatment of fabric (ironing) can be done edge-on (the sections retain their position after steaming), flat-ironed (the sections are ironed in different directions) and ironed (the sections are ironed on one side). The seam width is from 0.5 to 2 cm. A stitch seam can be made either without a fit or with a fit of one of the edges of the garment parts being sewn.
Flower nursery Green Gate
Do you like indoor or garden flowers? At the Green Gate nursery you can buy rooted cuttings and divisions of various domestic and perennial garden flowers. We have a constantly updated collection of anthuriums and hibiscus. Flowers and plants are sent by mail.
In this video you will see what kind of machine sewing stitches the Brother sewing machine performs.
Adjustment stitch
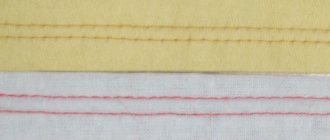
The machine sewing stitch is performed in two steps. First, we sew the parts to the required seam width and steam them “on edge”. Fold the top piece to the right side (turn the seam allowances to the top piece). We sweep, iron, lightly fixing the folds with an iron, and add a finishing stitch.
The distance between lines depends on the density of the fabric, style and fashion. If you make the allowance of the upper part 0.3-0.5 cm narrower than the lower one, then the open cut of the part will be closed with the top stitch.
A - adjustment seam with an open cut. B - adjustment seam with a closed cut.
Edge machine seams
Home → Machine sewing lessons → Edge machine stitches
This lesson will be useful for beginning tailors and students studying sewing technology.
There are a great many edge seams. Today we will look at only the three simplest and most commonly used edge seams, which are used when processing the edge of a product or its parts. These are the hem seam with a closed cut, the Moscow seam and the zigzag seam. Despite their intimidating name, these are ordinary seams that everyone interested in sewing has seen or tried to make.
Where are edge machine seams used?
- These can be very simple things: scarves, sheets, napkins, nightgowns, light cotton skirts.
- And more complex ones: thin dresses made of cambric or silk, frills, flounces, ruffles, bows, etc. As you can see, the range of applications for these seams is large and varied. Despite the simplicity of these seams, they are appropriate in many products, and the better you learn how to make them, the faster your things will look like professional ones and acquire a marketable appearance and gloss.
Closed hem or hem seam
You could say this is a working seam. Look what he looks like. To take a closer look, click on the picture.
I showed the use of a seam on a blouse. But this seam is used with the same success in table linen and bed linen.
The width of these seams can be from 0.5 cm in blouses and up to 20 cm in curtains. Of course, the techniques for making seams of different widths will be different, but the essence is the same. This is a hem seam with a closed cut or hem. You can see how this seam is made in the video at the end of the article. And I move on to the next...
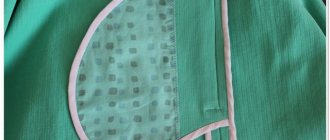
Moscow seam
At its core, this is the same seam that we looked at above - hemmed. But the technology for its implementation is fundamentally different. Why Moscow? Maybe because he came to Moscow model houses before everyone else. If the previous seam can be used on almost all types of fabric, except for particularly rough and non-flowing ones. There, a hem seam with an open cut is more applicable.
This is the Moscow seam, used only on thin fabrics and even loose ones. Its purpose is to process complex cuts of finishing elements of products such as molds, flounces, ruffles. They can also be used to hem the bottom of very flared items cut on the bias or in the sun.
Here is an example of using a Moscow seam:
Now, let's briefly consider the sequence of its implementation. The beauty of the seam and the skill of the seamstress is to make an even, narrow and elastic seam. Before sewing a seam, it is very important to adjust the thread tension in the machine, install a new thin No. 70-80 needle and select threads that perfectly match the color of the fabric.
The patterns are arranged in the order the seam is made. (To take a closer look, click on the picture; to close the photo, click on the cross in the lower left corner of the screen)
You can see how the Moscow seam is performed in the video located at the bottom of the article.
Finishing the edge with a zigzag stitch
Sometimes it is called opirovka. Its purpose is the same as that of the Moscow seam. But zigzag is used most often when they want to achieve additional effects. For example, on parts cut on the bias, zigzag processing additionally stretches the edge of the part and this decorates the product.
The second technique is processing with threads of contrasting or complementary colors. These effects are often used in stage or dance costumes. In ordinary clothes, they try to match the threads for finishing the edges to the tone of the fabric.
This seam has restrictions on its use. It cannot be used in loose fabrics. Don't take risks - it will come off! But zigzag is successfully used to stitch the internal sections of the product - seam allowances.
Application examples for finishing edges with zigzag stitching
How are these stitches made?
And in conclusion, watch how these seams are made in the video made during the preparation of a master class on sewing a children's headscarf with an elastic band.
I hope I didn't bore you. If you want to keep in touch with us, leave your contact details, and I will sometimes write and send you messages about new blog articles. After all, you want to learn how to sew? And I want to pass on my knowledge to you.
See you later. Irina Voroshilova was with you
PS. We have a VKontakte group “Utilitarian Handicrafts”
- Related Posts
- Why does the machine stitch meander!?
- How to sew smoothly?
- Edging the cut with bias tape
- Creative overlock
- Sewing small parts from capricious materials
- Sewing on a machine
Discussion: 29 comments
- Lidia Semenovna:
November 22, 2021 at 10:09 pmIrina! Please accept my gratitude for the excellent presentation of sewing lessons! I have sewn a lot in my life, but nevertheless, in every lesson I find something new for myself! I admire you! Live happily ever after!
- Lydia:
April 27, 2021 at 00:20
Thanks for the advice and video. I used to hear about the Moscow Seam, and now I can imagine how to make it. I’ll try it tomorrow.
- Raisa:
August 25, 2021 at 03:48 pm
Irina! Thank you!!! Of course, I learned something new from you. I once completed a course in Sewing. but shuttlecocks. frills, etc. I’m describing it wrong. I thought of it myself once and explained to all my friends how to do it. I have a SEAGULL, she has a foot with a needle. I put fabric under the foot. so that the right edge of the fabric fits into the slot with the needle. The fabric can be pulled. to make the shuttlecock cooler The shuttlecock turns out to be a MIRACLE!!!!!!!!!!!!!!!!! Try it if you have such a FOOT!!!!!!!!!!!!!
- Svetlana:
July 30, 2021 at 10:55 am
Thank you, Irina! This is a big help.
- Lily:
June 21, 2021 at 01:50
Irina, thank you for the invaluable lessons!
- Hope:
May 14, 2021 at 01:28 pm
Thank you, I sew a little myself, but I want to expand my horizons. I will be happy to learn innovations from YOU.
- Tatiana:
May 5, 2021 at 02:33 pm
I have been sewing, one might say, all my life (I am now 62), I studied in different ways, I even went to stores, looked at products, how this or that seam was made. I have good machines, a wonderful Elna carpet. But I paid attention to your language of presentation, read it and was delighted. I tested my knowledge, found something new for myself, and admired the way the material was presented—simple and understandable. It’s so good that there are people who are passionate about their work and do not regret passing on their experience to others. I enjoy reading your articles and will apply your advice in my practice. Thank you, Irina!
- Marina Lyubaeva:
April 22, 2021 at 11:49 am
Good afternoon, Irina! Thank you for the Moscow seam, which I didn’t know about before. Now I will use this seam. Thank you!
- Olga:
February 27, 2021 at 04:29 pm
Irina, hello, thank you for the valuable information, I still don’t know much, but thanks to you Irina I’m learning!!
- Olga:
February 22, 2021 at 10:00 pm
This is the first time I’ve heard about the Moscow seam. Thank you very much, Irina.
- Lyudmila:
February 4, 2021 at 01:26 pm
Thank you for your lessons.
- Lyudmila:
December 31, 2021 at 06:05 pm
Great article. This is exactly what I needed. THANK YOU, Irina!
- Svetlana:
December 24, 2021 at 6:38 pm
Thank you so much for the lessons, very interesting and useful information. Thank you!!!
- Love:
December 23, 2021 at 10:11 am
Irina, thank you so much for your lessons, so detailed and understandable. You provide material that is so necessary for my work, I always look forward to the next lessons. God bless you with patience and health!
- Love:
December 23, 2021 at 00:03
Thank you for studying. Sewing napkins was especially useful for me. Finishing the edges of the napkins and finishing the corners of the napkins was a mystery to me. Thank you.
- Tatiana:
December 23, 2021 at 00:00
Amazing! How simple and clear everything is. Thank you very much. Happy New Year!
- Iraida:
December 22, 2021 at 08:32
Thank you very much and good luck in the new year.
- Valentina:
December 13, 2021 at 04:31 pm
Super! Even I understand how to make a “Moscow seam”!
- Tatiana:
November 3, 2021 at 5:43 pm
Irina. Thank you very much for the lesson! I heard about the Moscow seam, but I learned how to use it from your lesson, I’m looking forward to the continuation. Thank you!
- Irina Voroshilova:
August 12, 2021 at 11:06 pm
Larisa, it’s not advisable to use special paws at home. While you are installing the foot, you can already sew. In addition, you need to be able to sew with paws. It takes skill.
- Orphan Larisa:
August 12, 2021 at 09:16 pm
Thank you! Such valuable information, you have to rummage through books for a long time to find such a lesson. Everything here is clear and simple. But I realized the following: technology is developing, sewing machines have appeared (I have Vernina), for which you can buy as many presser feet as your wallet allows. In this case, there are hem feet of 2mm by 4mm by 6mm. Well, thanks a lot for the lesson anyway. I watched with great interest.
- orphan Larisa:
January 26, 2021 at 01:26
Irina! You've found your niche perfectly. Velvet dresses are gorgeous. In the store I looked at this velvet with a look: Good material, so what... No ideas. Moreover, velvet is completely synthetic. We collected very valuable information on sewing knitwear. Everything is read on the Internet, but in different places. I brought cotton knitwear from Israel, thanks to your advice I can sew it correctly. I have an overlocker and a Vernina sewing machine. I won’t be able to buy your master classes, because the cost is my pension. But I’ll read free master classes. Thank you
- Svetlana:
January 19, 2021 at 11:35 pm
Irina, thank you very much for sharing such useful and interesting information with us!
- Irina Voroshilova:
April 8, 2015 at 08:52
Tatyana, there are no stupid questions. Making a zigzag seam in one way or another depends on the purpose. For example, to overcast an edge, you can use this technique youtu.be/HwII6Nd6iAw Some fabrics can be overcast along the edge, and some can be stepped back from it, and then trim the edge to the line.
If you want to make a scarf, then look at this MK babairisha.ru/soshem-kras…v-ego-nosheniya/ This is also my site Utilitarian needlework
- Tatiana:
April 8, 2015 at 02:29
Sorry for the stupid question: should the zagzag seam, how can I put this more clearly, not reach the edge of the product, or does it, as it were, “hug” the edge on all sides?