Pay attention to the lightning
Truly high-quality clothing will most likely be equipped with a metal zipper, because a plastic one may well stretch over time. Its use is allowed only when joining fabric edges that do not bear significant load. For example, on shirt pockets. Pay attention to the edges of the zipper. They must be on the same level. If this is not the case, then the zipper was sewn in in a hurry. The quality of work is clear.
How to make a perfectly straight decorative stitch
Sometimes, you need to make a perfectly straight decorative stitch on a product, but you can’t draw a line with chalk, since marks will remain, and you don’t have enough experience to make a perfectly straight stitch “by eye.” For such a case, there is a special glue that can be used to temporarily glue paper tape to the back or front side of the product. The edge of a perfectly straight strip will serve as a guide. To perform a straight stitch, take paper. Apply a thin layer of textile glue to it. It will increase the adhesion between the fabric and the paper, and it will not move. Apply a thin layer of textile glue to one side of the paper, let it dry, and then apply the strip to the fabric. The edge of the strip should be at the line of the intended decorative finishing stitch. Place the paper on the fabric with the edge along the intended stitch line. Sew so that the paper is under the foot and the needle goes as close to the edge of the paper as possible.
Label
Read what it says there. Many people brush it off, saying that everyone there is lying. No, the manufacturer understands that making mistakes on such an easily verifiable detail is costly. Clothes made from 100% cotton are, of course, environmentally friendly, but they have one very unpleasant property - they shrink after the first wash. Therefore, choose things where the cotton composition includes at least 5 percent of other components that neutralize the compression of cotton threads.
“We are still friends”: Derevianko commented on the breakup with his wife
It’s good to wash often: myths about shampoo and hair care that only harm
Rare shot: Viktoria Isakova showed her grown-up daughter from Yuri Moroz (new photo)
Stitch fastening. How to start and finish hand stitching correctly?
Good day, dear blog readers!
When performing any task, it is very important that the efforts and labor put in are not wasted.
It's the same with hand stitches. It is necessary to make sure that they are reliable and that during the sewing process, during further work with the product being sewn, the stitches do not pull out, fall apart, unravel, etc. And for this, hand stitching must be started and completed correctly.
What does it mean to correctly start and finish a line laid by hand? This means that at the beginning of its execution and at the end it is necessary to secure the thread with which the seam was made in the material.
Hand stitches.
Hand stitching with straight stitches.
Hand stitching with bias stitches.
Hand stitching with loop stitches.
Hand stitching with loop stitches. Back stitch, manual machine stitch.
Hand stitching with cross stitches. Goat seam. Herringbone seam.
Bartacks for hand stitching.
There are several ways to gain a foothold in the material.
1. You can start by performing the simplest knot No. 1 . If the fabric is dense, then a knot is enough.
2. But much more often it happens that the knot is clearly not enough. Sometimes you have to pull the thread to gather the fabric, fit it, etc. And a knot can easily slip between the threads of the fabric due to its small size or because of their loose weave. Therefore, in these cases, the thread needs to be secured in other ways, more reliably.
Tack No. 1.
We start with a knot so that the tip of the thread does not pull out during work. Then, after stitching the bartack, the knot can be cut off.
We bring the thread to the opposite side and
We make several loop-shaped stitches through the edges of the fabric, one on top of the other.
And then you can safely work, laying the necessary line manually.
This type of fastening can be safely done both at the beginning of the seam and at the end.
Tack No. 2.
Now let's see what setting No. 2 will look like. But for variety, we’ll do it at the end of the seam. Although it can (and should) be done at the beginning of the seam.
So we've done the line. We are gaining a foothold on this “frontier”. At the very edge of the fabric,
literally a few millimeters from it, we make several small stitches 3 - 5 mm long.
We lay the stitches one on top of the other (the stitch “back stitch”)
If the seam being laid is temporary, then the ends of the thread that are no longer needed after the fastening can be simply cut off with scissors. Well, let the “stumps” stick out a little in different directions. After all, the thread will then be completely removed anyway, sooner or later.
And if this is already a permanent seam, and it will “live” in this place forever from now on, then the tip of the thread needs to be hidden. So that neither the seam nor the bartack unravel, and the tip of the thread does not stick out unattractively on the finished product.
You need to use a needle to thread the end of the thread
somewhere in the allowances or in such places, where it will not be visible, and where it will also be additionally kept from fraying by the fabric and cut with scissors close to the surface of the fabric.
Nodule No. 2.
Again before us
hand stitching,
which needs to be secured, this time also with a knot, but done differently. In addition, this knot is much more reliable than the previous one. Such a knot is quite suitable for using it to secure a thread both at the beginning of a seam and at the end, and even in any material.
A few millimeters from the edge of the fabric (up to 5 mm)
make a small stitch (3 - 5 mm) in the opposite direction. A loop has formed.
In the direction away from us, we thread a thread and a needle into this loop.
Another loop has formed. Now you need to thread a needle and thread into it, but in the opposite direction, towards yourself.
And tighten the knot by simply pulling the thread.
When making hand stitches, do not forget to secure the thread at the end. Such a seemingly trifle will significantly save you time and nerves.
You can see how to secure machine stitches in this article.
All the best to everyone! Sincerely, Milla Sidelnikova!
Sew with an invisible seam on a machine
Even a novice seamstress can create an invisible seam using a sewing machine. You just need to know a few nuances. To figure out how to sew without a seam using a sewing machine, you need to prepare the right tools and make the appropriate settings for the device itself. This particularly applies to the paw.
Correct foot
Careful preparation of the instrument is also necessary. In addition to choosing a presser foot, it is worth performing a standard check of the device for functionality. Next, you can begin to consider the settings that are made for example on a Janome sewing machine:
The instructions on how to sew two parts of fabric with an invisible seam on a sewing machine consist of performing the following steps:
- Fold the fabric as desired and iron it well. Then the lapel of this part is carried out. A clear line remains on the canvas along which the stitching will be formed.
- Next, the material is laid. Here it is worth using a certain pattern so that the seam is accurate and hidden. The diagram is presented below.
- When making the seam itself, you need to ensure that the needle catches only a few threads along the ironed fold. Otherwise, the thread will appear in the front part of the product.
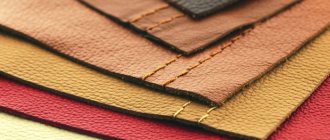
Sewing seam in denim products
Made for denim products, it differs in that two lines of contrasting threads are laid along the front side of the product. These lines, in addition to their connecting function, also play a decorative role.
In factory products, on the wrong side of such a connection you can see two chain stitches, since it is performed in one operation on special machines with three needles.
Without special equipment, such a stitch will not be possible. But, in everyday conditions, you can also make a similar one.
On the front side it will look like it was made in a factory way, and on the back side instead of chain stitches there will be the most ordinary ones.
To make a backstitch, we provide 15 mm allowances on the workpieces.
Next, we carry out step-by-step schemes for making a hemming seam using any of the methods described above before the operation of overstitching the folded edge.
For example, let's do this using method No. 2. We connect with a basting seam, then we sew together the parts and make bartacks. The stitching seam width is 15 mm.
Iron the fabric on both sides.
We trim the cut on one part.
We wrap the allowance of the second piece around the cut of the first and baste it.
We lay out the parts, turning them to the sides from the joint.
Iron the folded edge to the side of the piece from which the allowance was cut.
Iron the material along the front side.
Now on the front side of the part on which we have ironed the seam allowances, we stitch with contrasting threads, departing 0.1 cm from the fold.
Then we lay a second line with contrasting threads on the front side of the same part at a distance of 5-7 mm from the first. It is important to control the strict parallelism of the lines. It is convenient to do this, focusing on the width of the foot.
The second line can also be made along the wrong side on the folded edge, departing 1 mm from the fold.
Iron the material on both sides.
The finished connection on the front side is shown in the following photo.
The reverse side is shown below.
How to tie a knot in a thread after sewing
At the end you also need to tie a knot. This will prevent the seam from coming apart. There are five ways to finish the job:
- A simple knot. At the end of the stitch, the thread is pressed against the fabric with your finger, making one turn around the pad. A needle is inserted into the resulting loop and the knot is tightened. This method is the least reliable and most visible.
- Reliable fastening knot. When the last stitch is made, the thread is not pulled out of the fabric completely. The needle is inserted between the beginning and end of this stitch and passed through the loop, tightening it. It is better to repeat this action twice.
- Back stitches. This is the most discreet way. Having finished the line, make a stitch by inserting the needle into the previous place where the thread came out. Then stitch forward, coming out again at the end. Repeat the same action again. For reliability, you can additionally make a knot as in the previous paragraph.
- When embroidering. To secure the embroidery, you can repeat several previous stitches, going back. You can also use the method described in the second paragraph, without stitching the entire fabric, but working on its fibers from the wrong side (that is, hook the needle on individual fibers from the wrong side so that the stitching is invisible from the front side). Another option is to tie a loop directly on the stitching elements and the back side, tucking the end of the thread into the seam.
- For double thread. This is the easiest method to implement. The needle is pulled off the threads, after which the ends are tied together with a double or triple knot.
To watch the video:
The knot is a very important element of any sewing. It holds the thread in the product, preventing the seam from breaking. There are several ways to tie a knot, among which everyone can choose the option that is convenient for themselves.
How do you secure your sewing? Share your techniques in the comments. Tell your friends about the article on social networks.
Seam "forward needle"
The simplest seam resembles a dotted line; it is the same from the front and back. You will have to sew from right to left, that is, not the way we write and read, but vice versa. It’s easy to make such a seam; it’s especially quick to sew fabric with it if you put several “waves” on the needle at once, and then pull the thread through them.
Seam “forward needle”
The “forward needle” seam is usually used to hold together several pieces of fabric, if this is done for a short time. “Baiting” is what this process is called.
How to cook a seam
When welding in the lower position, no difficulties arise even for a novice welder. But all other provisions require knowledge of technology. Each position has its own recommendations. The technique for making each type of weld is discussed below.
Welding vertical seams
When welding parts that are in a vertical position, the molten metal slides down under the influence of gravity. To prevent droplets from coming off, use a shorter arc (the tip of the electrode is closer to the weld pool). Some craftsmen, if the electrodes allow (they don’t stick), generally rest them on the part.
Metal preparation (cutting edges) is carried out in accordance with the type of connection and the thickness of the parts being welded. Then they are fixed in a given position, connected in increments of several centimeters with short transverse seams - “tacks”. These seams prevent parts from moving.
A vertical seam can be welded from top to bottom or from bottom to top. It is more convenient to work from the bottom up: this way the arc pushes the weld pool upward, preventing it from falling down. This makes it easier to make a quality seam.
How to weld a vertical seam from bottom to top: electrode position and possible movements
This video shows how to properly weld a vertical seam using electric welding with the electrode moving from bottom to top without breaking off. The short roller technique is also demonstrated. In this case, the electrode moves only up and down, without horizontal displacement, the seam is almost flat.
You can connect parts in a vertical position by breaking off the arc. For novice welders, this may be more convenient: during the tearing process, the metal has time to cool. With this method, you can even rest the electrode on the shelf of the weld crater. It's easier. The pattern of movements is almost the same as without lifting: from side to side, in loops or in a “short roller” - up and down.
How to weld a vertical seam with a tear, see the following video. The same video tutorial shows the effect of current on the shape of the seam. In general, the current should be 5-10 A less than recommended for a given type of electrode and metal thickness. But, as shown in the video, this is not always true and is determined experimentally.
Sometimes a vertical seam is welded from top to bottom. In this case, when igniting the arc, keep the electrode perpendicular to the surfaces being welded. After ignition in this position, warm up the metal, then lower the electrode and cook in this position. Welding a vertical seam from top to bottom is not very convenient, it requires good control of the weld pool, but in this way you can achieve good results.
How to weld a vertical seam using top-down electric welding: position of the electrode and movements of its tip
How to cook a horizontal seam
A horizontal seam on a vertical plane can be made both from right to left and from left to right. There is no difference, whoever is more comfortable cooks it that way. As when welding a vertical seam, the bath will tend downward. Therefore, the angle of inclination of the electrode is quite large. It is selected depending on the speed of movement and current parameters. The main thing is that the bath stays in place.
Welding horizontal seams: electrode position and movement
If the metal flows down, increase the speed of movement, heating the metal less. Another way is to make arc breaks. During these short intervals, the metal cools down slightly and does not drain. You can also slightly reduce the current. Just apply all these measures gradually, and not all at once.
The video below shows how to properly weld metal in a horizontal position. The second part of the video is about vertical seams.
Ceiling seam
This type of welded joint is the most difficult. Requires high skill and good control of the weld pool. To make this seam, the electrode is held at right angles to the ceiling. The arc is short, the speed of movement is constant. They mainly perform circular movements that widen the seam.
Ignition of an arc with an electrode
In order to light an arc, you need to bring the electrode to the metal and lightly tap it on the surface, immediately moving it upward. There is no need to move the electrode too far, since the arc will certainly go out. It is enough to withdraw by 2-3 mm.
You can also light an electrode by striking its end against a metal surface. We just take it and, as it were, move the electrode with a short movement across the metal until the welding arc lights up.