History of appearance
Today, a bandana as a headdress is in every second wardrobe of modern young people. They are used to diversify and revitalize the appearance and protect from the sun. The exact time of appearance of the first models is unknown. We can assume that this was around the 18th century. It is unclear who invented this accessory. Initially, this wardrobe attribute was used to protect against dust and heat. For this reason, many researchers present the theory that the center of distribution of this accessory is India.
Handmade bandanas
If you translate this word from Hindi, it means tying. According to the translation provided by the Spanish dictionary, in Russian this word means the same thing. Traditional designs include a paisley pattern. These are different types of small curved water drops.
In Spanish settlements, this item was actively used by shepherds who worked in difficult circumstances. Later in the 18th century, one could notice the fashion for bandanas in the United States. There, wrapping a bandana around the neck became mandatory. They wore this product for protection from the sun and dust.
Interestingly, in the 90s, the accessory became an integral part of hippies and bandits’ equipment. Many bandits used it to hide their faces. They inherited this tradition from pirates, who, according to many movie directors, wore bandanas. According to sources, this version is a myth.
First headdress
Material selection
At the moment, a bandana can be made from any material. Before sewing a product with your own hands, you need to decide on the density of the fabric. It can be dense or transparent material. The headband can be made from chintz, calico, cambric, or natural materials such as chiffon, silk and cotton. If the product is made for the autumn-winter season, then you need to focus on warm fleece.
You might be interested in: Making patterns and sewing dog beds
Cotton as main material
When choosing a fabric, you should also look at its color. Camouflage or denim looks interesting. It is worth giving preference to those materials that are combined with the top of the product. Regarding children's things, boys' bandanas will not suit girls and vice versa.
Made from knitwear
Choice of fabric and model
To easily cope with such a task as sewing a bandana, first of all you need to choose the right material. Cotton and linen are considered the best solution. It is also possible to use durable, slightly stretchy fabrics, such as cambric, chintz or calico. Due to the fact that the main purpose of a headdress is protection from sunlight, these materials are ideal. If the product will not be used daily, you can use synthetic fabrics, but it is better to give preference to natural ones. Pay attention to thin materials such as chiffon only as a last resort.
Batiste
Calico
Linen
Chintz
Cotton
The classic model is a square made of fabric, tied in a special way on the head. The size of the bandana is determined taking into account who will wear it. There are several options:
- men's bandana—70 x 70 cm;
- female model - 60 x 60 cm;
- children's room – 50 x 50 cm.
These dimensions are approximate. When making a headdress yourself, measurements must be taken and a pattern made . The size of the product also depends on its type. For example, bandana headscarves are made according to head circumference measurements, usually sewn in the shape of a square with a side equal to 50 cm (options for babies), 60 cm (standard products) or 70 cm (large). Transforming models have fixed sizes: 50 cm in length and 22 cm in diameter for children, 53 cm in length and 26 cm in diameter for adults.
Common bandana models:
- The classic model, which is a square scarf.
- Product with elastic band. The main advantage is that the item does not fall off the head.
- With ties. It is considered a universal model, suitable for people of any age and gender.
- Buff. This is a kind of transformer, made in the form of a pipe. Made from elastic fabric. The headdress is also worn as a mask, hood, or cap.
- Bandana with a visor for women or men. A multifunctional option that can be used at any time of the year. Typically, there are ties at the back that allow you to adjust the size.
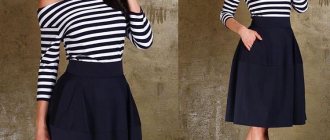
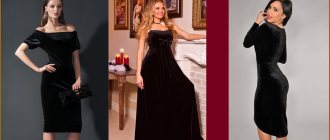
It is advisable that the tone of the bandana be in harmony with the clothing. For men, models in muted shades, such as green, gray or blue, are an excellent solution. Women often choose light-colored options. In children's models, prints are preferable.
Classical
With elastic band
With strings
Buff
With visor
Types of bandanas for adults and children
A bandana can be represented by a scarf, a bandana with ties, with or without a visor.
Bandana scarf with elastic pattern
There is also a model in the form of a hat, a transformer and a bandeau. A scarf is a cotton square of calico, calico and cambric material. It can be 50 by 50 centimeters or 70 by 70 centimeters. It can also be presented in the form of a triangle.
Bondo head bandana men's pattern
Bandana with ties - triangular linen or cotton model. This is also a model made of kulirka and interlock. Can be made from fleece, suede, leather and fur. It can be presented with or without a visor. A bandana in the form of a cap is a regular round knitted summer model with or without ties.
With visor
Bandana pattern
It is not difficult to make such an element as a bandana pattern. This is a unique accessory, the patterns of which do not differ from the pattern for creating a cap or other round headdress. The pattern of the model for the summer, size and other details will depend on the type of model. Below are diagrams for creating a classic square army model for men, interesting life-size pirate products and headscarf models for women, and simple master classes for their formation.
Bandana pattern for men
Classic square bandana for men
To make a classic square men's bandana, you need to take a large piece of fabric with dimensions of at least 60 by 60 centimeters. Any material is suitable for cutting. You can use cotton muslin, which is abrasion-resistant. Next, you need to draw a square on the fabric using a regular stationery or meter tailor's ruler. Then draw a square 60 centimeters long. This parameter can be slightly increased or decreased in size.
It’s easier, before sewing a bandana pattern with your own hands according to step-by-step instructions, make a drawing of a square right on the corner of a fabric flap or an awl. This way you can avoid unnecessary trimmings. It is worth pointing out that marker lines do not need to be made in the case of permanent markers. The contours of the future square should not have an ideal shape, but straight lines can give the bandana a neat and tidy appearance.
You might be interested in this All about industrial sewing machines in production
Next you need to make a square pattern from fabric. The easiest way to initially make the cut is with sharp scissors. Then you need to try on the cut out headdress on your head. This stage involves fitting to inspect the size. If the bandana is large, it can be made smaller. It is imperative to process the fabric using a hemmed seam.
In the end, all that remains is to decorate the classic men's model. For example, a patch or machine embroidery is perfect for this. The registration emblem looks good on classic textiles. Be sure to iron the fabric thoroughly before decorating. Then the bandana pattern for a boy will be successful.
Basis for a classic square men's bandana
Women's headscarf
The women's headscarf is made using the same method as the men's classic bandana. You need to take a square cut of cotton or any other fabric and form a clear square with dimensions of 60 by 60 centimeters. Then make a line along the contour, forming a dart. Then try on the finished product by folding the fabric in half and tying it on the back of your head.
Basis for women's headscarf
Bandanas for babies
A bandana for a baby can be made like a simple women's headscarf or a regular men's classic model. You can also try making a model with a visor. To do this, you need to clearly form a pattern according to the template presented below, and carefully stitch it around the edges. Then you need to take the finished plastic model of the visor, cover it with fabric and carefully stitch all the protruding elements. At the end, connect the visor to the formed product and decorate as desired. To decorate a bandana for a baby, you can make a machine yourself or complement the product with machine embroidery.
Model for baby
The nuances of tailoring taking into account the model
There are different types of bandanas; you need to choose a model based on personal preferences. The manufacturing process is simple, even a novice craftswoman can handle it. All you need to do is take your measurements correctly and follow the master class step by step.
Classic square
The classic bandana is especially easy to make. It's essentially one large square piece of fabric. To create it you will need the following materials and tools:
- textile;
- scissors;
- threads;
- needle;
- sewing machine.
For a product with a side of 54 cm, first of all we draw a square of 56 x 56 cm on the spread fabric. Then we bend each side one by one by 0.5 cm, then iron it. We repeat the action again. Next, we sew each folded side with a basting stitch. All that remains is to sew the product on a typewriter. If you have an overlocker, then hemming the product is not necessary. The classic square head bandana is ready.
Transformer (made of knitted fabric)
The buff bandana is a transformable cylindrical model; it is worn not only as a fashionable headdress, but also as a hood or scarf. To make it you will need:
- knitted material of suitable size;
- scissors;
- needle;
- threads
To begin, you need to cut a rectangular piece of fabric. If the product is intended for a child, then the dimensions of the material should be 24 x 40 cm, if for an adult, then 100 x 52 cm plus an allowance of 1.5 cm. Next, you need to hem the edges of the bandana. Then fold the cut in half along the long side, wrong side out, and sew. All that remains is to turn the product inside out.
The transforming model is put on the face with the hole of the cylinder. The remaining part covers the head and neck. This is a very fashionable and stylish option that young boys and girls love. A handmade bandana buff will become not only a wonderful accessory, but also the pride of the owner.
With elastic band
The product with elastic is perfect as an accessory to summer dresses and sundresses. It is advisable to select natural, light-colored materials. For production you will need:
- 2 pieces of fabric (38 x 18 cm; 28 x 10 cm);
- scissors;
- needle;
- threads;
- elastic band 10-14 cm long;
- pins.
After preparing the materials and tools, you can begin to work. A smaller piece of fabric must be folded in length by 0.5 cm and hemmed with a hidden seam. Then you should sew the edges of the workpiece from the wrong side, turn it onto the face, insert an elastic band that needs to be stretched along the length of the fabric and sew with a zigzag seam at a distance of 1-2 cm from the edge.
Fold the second fabric rectangle across the width like a fan and secure with pins. All that remains is to insert the edges of a large piece into the holes of the workpiece with an elastic band and stitch it together. A stylish summer headdress is ready.
Children's
The children's bandana is sewn from thin natural fabrics. The product for boys can be decorated with appliqués, for girls - with embroidery. To make a headdress you will need:
- textile;
- scissors;
- thread;
- needle.
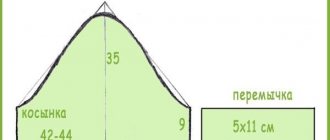
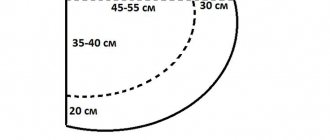
First you have to make a pattern. To do this, you need to draw a semicircle with a diameter of 22 cm, a height of 6 cm, and two rectangular strips measuring 10 x 33 and 8 x 85 cm. The pattern must be transferred to fabric and cut out, leaving allowances of 1-2 cm.
A section of 10 x 33 cm is the middle of the bandana; the two resulting semicircles should be sewn to it and the edges should be processed. Next, you need to measure the circumference of the baby’s head on the product, and the half-circumference on the remaining part. Then you need to stitch the workpiece to the marks. All you have to do is turn the product inside out, sew on the ties, and the bandana is ready.
An original and easy-to-make hat will perfectly protect a child’s head from the sun. A bandana for a boy can be made from fabric with cars, ships, or favorite cartoon characters. Materials with flowers, dolls and other cute prints are suitable for girls.
Sewing a women's bandana with an elastic band
A women's bandana with an elastic band can be made like a hat or like a cap. In the first case, it is necessary to cut the fabric according to the presented diagram, carefully stitch the ends of the product so that no threads appear. Next, you need to make holes in the prepared pattern, put pins in them and insert a cord or elastic band into the product. At the end, as in previous cases, you can make a decorative finish or use several different types of fabrics.
You might be interested in How large-format prints are made on fabrics
Women's model with elastic band
Sewing a women's bandana with a visor
The female model with a visor can be made using a plastic blank or dense processed fabric. In the first case, it will be a high-quality model to protect the eyes and head from the sun, and the second will act as an interesting decorative object and perform only the function of protecting the head from overheating. In any situation, it is necessary to make a pattern for the product, sharpen it well, and then form the finished product. After drawing the parts and cutting them out, you need to carefully iron the workpieces and begin stitching.
If desired, an elastic band can be added to the bandana to change the size. Then the step-by-step stage of the work changes and looks like this: first, the final model is created with an allowance for the elastic, the elastic is inserted, and then the visor is made and sewn to the product.
Pattern of a female model with a visor
Bandana with ties: with and without visor
For the summer season, they are sewn from natural fabrics (linen, cotton) or natural knitwear (kulir, interlock). For cold weather, warmer fabrics are selected: fleece, suede, leather or even fur. I always recommend making a pattern out of paper, gluing it (make allowances first so that you have something to glue it with) and trying it on. Make changes to size, shape or add to the thickness of the fabric. If you look at the species, they can be
a) simple with ties.
b) without a visor
I am receiving signals from readers that the patterns may be small. I warn you that it is better to draw each pattern on paper, put it to your head and make changes. There are no perfect patterns because heads are different sizes.
c) with a visor
From the last two pictures you can see that the bandanas differ in cut.
Here is another bandana pattern
Many patterns and styles can be found in knitting magazines or from various needlewomen who offer the pattern for the finished product. For example:
How to decorate
A bandana is a model that can be beautifully decorated using different materials. You may need additional beads, buttons, ribbons, openwork Swarovski beads, feathers, artificial flowers, clips, smooth and machine embroidery, sculptural items made of polymer clay, knitted inserts, miniature floral elements and other materials. Naturally, all of the listed decorative items can be used as desired.
As a rule, ribbons, brooches and beads are used to decorate a scarf or scarf. Stripes and stickers are often used on fabric. Models with a visor decorated with rhinestones or personalized embroidery in the very center look interesting. The option that looks stylish is when the scarf is designed in a patchwork style, that is, with the addition of various cotton materials and is literally created piece by piece.
Model decorated with a brooch
In general, you can make a headdress such as a bandana with your own hands from available materials, using only a ready-made diagram from the Internet and the simple step-by-step instructions given above.
How to crochet a bandana for a boy
According to these patterns, a bandana can be crocheted with a visor, or without it. For summer crocheted hats, the following threads are recommended:
- "Chamomile" Kirovskaya;
- Coco;
- “Lily” Semenovskaya;
- "Begonia" mercerized cotton 100% Türkiye.
- After selecting the threads, select a hook that will match the thickness of the thread.
What we need for work:
- “Begonia” mercerized cotton 100% Turkey - 1 skein (280i/50g);
- Hook – 1.5 mm.
Abbreviations:
- VP – air loop;
- Runway – air lift loop:
- Dc – double crochet;
- СС – connecting column;
- From* to* - repeat loops.
We will knit according to the pattern:
Description of the cap:
Knitting is done in a circle using the method of adding stitches.
1st row: dial 6VP and close in a ring.
2 rows: we knit 14Dc into the ring.
3 rows: 3RVP, VP, and in the DC of the previous row we knit *1DC, VP, do not skip more than one loop, 2DC in the next loop of the previous row, VP*, continue knitting from* to* until the end of the row, finishing the row by knitting in 3RWY SS.
4 rows: 3VP, VP, CCH into the arch from the chain loop of the previous row, *VP, 2DC into the next arch of the previous row, VP, CCH, VP, CCH* we continue to knit from* to* until the end of the row, we finish the row by knitting in 3RWY SS.
We continue to knit in the round in each row, knitting one more DC. For example, in the fifth row there will already be two, but three DCs in each loop of the previous row.
In this way, knit 11 rows, if the cap has reached the required depth, then knit the last row with a sc and proceed to knitting the ties.
After processing the edge, do not break the thread, but collect as many VPs as needed to tie on one side, then tie on the other side. Knit a chain of VP RLS in turning rows, leaving 3-4 loops short each time. Knit as many rows as you think necessary. Repeat knitting the tie on the other side.
Visor diagram:
The visor is knitted tightly according to the pattern, in single crochets, in turning rows.
The bandana can be left without a visor, this is at personal discretion. All that remains is to decorate the headdress with applique, the diagrams of which are given below. They are made in a marine theme and are suitable for relaxing on the beach.
Application schemes:
You can decorate a bandana with a boat like the one in the picture.
There are a lot of patterns for an ultra-fashionable headdress; all you need is desire and a little experience, and then your little boy will be the most stylish guy.
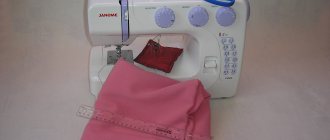
We figured out what to do with those who love to knit, what to do for those who don’t know how to knit, but really want to make a bandana with their own hands, then a master class on sewing a summer headdress for a boy is just below.