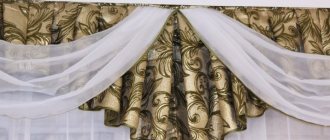
Curtains with swags: photos and types of products
Swag is an element of a lambrequin. It consists of several components - two shoulders and depth. A “shoulder” is placed along the cornice, and the depth is equal to the distance by which it is planned to lower the fabric down. Modern masters distinguish several types of swags, namely:
- symmetrical;
- with a vertical shoulder;
- asymmetrical;
- mechanical;
- with sagging.
Ordinary symmetrical curtains with swags can be easily made yourself. You don't even need a pattern for this.
DIY lambrequin: photo and sequence of actions
Sewing curtains with swags consists of several key stages. Let's look at them in more detail.
- First of all, you need to choose a suitable product model and draw up a sewing pattern.
- Using the dimensions of the swag, determine the required amount of material;
- Then we scale the finished curtain template and turn it into a pattern. All parts are placed diagonally on the fabric and cutting is performed.
- We proceed directly to sewing - we make folds, process the edges, sew seams, hem curtain tape or Velcro to securely fasten the product to the cornice.
Before you start sewing curtains with your own hands, be sure to measure all the necessary parameters of the future product. To do this you will need the following data:
- cornice length;
- half the length of the lower sag;
- depth.
The easiest way is to take accurate measurements of the window and go from there. If you plan to make a neat, symmetrical piece, place the pattern on fabric that has been previously folded in half.
Main types of lambrequins
A lambrequin is a separate horizontal part of the curtains, located at the top of the curtains. This detail serves to decorate the design of window openings, giving the design sophistication and a special style. A lambrequin can disguise a not very fashionable cornice, update a slightly outdated curtain, giving it a new sound. A correctly selected lambrequin can change the interior of the room as a whole; different cut options can visually change the size of the window - reduce it, make the window opening “higher” or “lower”. Lambrequins can be draped or straight (bandeau). It’s not difficult to cut a rigid bandeau, so let’s pay attention to the cut of draped lambrequins. They are very diverse and the following terms are used to denote their variants:
There are many types of lambrequin drapery, using which to decorate openings you can achieve the visual effect of changing the size of both the window and the entire room.
- Swags are semicircular draperies with evenly laid folds or gathering. If the drapery is laid using curtain tape or on a machine, then these are “mechanical swags”. Basically, the direction of the folds is made along the cornice. But there are also vertical swags, when the folds are laid along a line perpendicular to the line of the cornice.
- Flips are a type of swag, but with sagging fabric, creating free space between the shoulders.
- De jabot is a type of lambrequin assembled from one section. The second cut falls freely, forming a beautiful wave-like gather. De jabot can be cut in different shapes - symmetrical, asymmetrical, angular, double, multi-layered. The cut of such curtains is not complicated, so this type of decoration is quite often used when making curtains yourself.
- Coquille is a kind of de jabot, but always symmetrical. In this case, the folds are laid in opposite directions from the shorter edges to the longer middle. But, the “opposite” shape of the mold is possible, when the edges are longer and the middle is short.
- A bell is a part of a lambrequin that resembles a bell in shape. It is used to decorate the edges of the composition, and can also act as inserts between swags.
- A tie is a narrow, elongated element with a drapery shape in the form of a spiral. It is used, like a bell, to decorate edges and for inserts.
Related article: Wood stain: water-based colors, do-it-yourself white, photo of oil and bleached oak, tinting
DIY lambrequin: lambrequin patterns
If you are not confident in your own abilities, use ready-made lambrequin patterns, which are presented below. But do not forget that you need to transfer them to the fabric taking into account your swag size.
To show your imagination and creativity, develop a sketch of a lambrequin yourself and then bring it to life. The diagram must be extremely accurate, it is advisable to use a scale of 1:10. For example, a five-meter lambrequin on paper will be equal to 50 cm. This will greatly facilitate the process of taking measurements. If you are fluent in a graphic editor, create a pattern directly on your computer.
Sewing a rigid lambrequin
A rigid lambrequin is a bondo or decorative curtain element created on a dense non-woven material. It is called bondo because it is created using the material of the same name, which is glued to the main fabric. This ensures the required shape. In addition to aesthetics, it serves the function of removing the cornice and placing curtains. Also used to visually increase the height of ceilings.
To create a rigid lambrequin, you need to take the main fabric, bondo, decorative fittings, threads, pins, paper, Velcro, scissors, iron and sewing machine. To form a more voluminous rigid cut material, you can use a polylon layer.
Bondo as the main material for sewing rigid lambrequin
To shape the product, you need to make a life-size pattern on paper, starting from the dimensions of the length of the cornice. To do this, you can study the material, how patterns of lambrequins with life-size dimensions are made.
Next, transfer the pattern to the adhesive material. Cut the product without allowances. Then secure the resulting workpiece with pins and iron it until the adhesive fabric is completely attached to the curtain. Afterwards make a lining layer. To do this, place the blanks on a piece of fabric, trace and cut out the patterns. Attach the lining to the main piece with pins so that the right sides match and the adhesive fabric is at the top. Sew all sides except the top end. Turn the lambrequin right side out and iron it again. Sew or glue velcro along the top where the cornice will go.
If the product has rounded or sharp bends, before turning it inside out, it is necessary to make notches along all edges. This will remove any tension in the fabric and ensure that the fabric lays beautifully and retains its shape.
You can decorate the created lambrequin with tassels, threads, beads, and beaded ropes hanging beautifully from the bottom. This will revive any lambrequin model and make the interior original, regardless of the color scheme of the room or its style.
You may be interested in this: Sewing a beautiful robe without a pattern and sewing
Note! Before sewing, it is necessary to take into account the shrinkage of the fabric and study how to make a lambrequin pattern correctly. With high humidity, the product will lose its shape, warp or be deformed in other ways. To avoid this situation, it is necessary to wash, dry and iron the lining or base layer before sewing.
Hard lambrequin
What is a mold: pattern and photo
The vertical part of most lambrequins with vertical folds converging in the central part is called a mold. The pattern of a classic product in a straight line looks like this:
You only need 3 measurements:
- height of the middle part of the mold;
- side height;
- width along the eaves.
The standard product consists of 10 folds. In this case, the distance between them should be no more than 5 cm. The width allowance is 20-22 cm.
To calculate the distance between pleats, use the following formula:
(Product width – 20 cm): 8 = X, where X is the required number
When cutting, do not forget to create small notches that will allow you to correctly assemble the mold.
Beautiful, elegant and timeless curtains with your own hands are easy. The main thing is to be patient and not give up if things don’t work out. Over time, such crafting can turn into a favorite activity, bringing good income and pleasure.
LiveInternetLiveInternet
Source: https://lambrecen.ru/?page_id=441
Well, finally, having become familiar with the basic methods of processing and sewing lambrequin parts, we will begin sewing a lambrequin from its simplest parts: jabot and mold. Today we will sew this lambrequin from 6 parts: 4 jabots (de jabot) and 2 molds:
We need a lambrequin for a cornice 2m long.
1. First we build a lambrequin diagram:
Now that we know the dimensions of the lambrequin parts in the diagram, we calculate the folds and draw patterns for the jabots and molds on a reduced scale (the numbers on this diagram are in centimeters). We take the height of the sides of the jabots and the molds from the first diagram:
Thanks to our diagrams, we now know the dimensions of our patterns in full size, as well as the depth of the folds (20 cm, I do not recommend making them smaller) and the distance between them - 5 cm and 6.7 cm. We lay out the fabric on a cutting table or on any horizontal surface (I mean the floor in the apartment, since the patterns of these parts can be very long and do not fit on the table) and cut out the lambrequin parts according to the calculations given above or according to READY-Made PATTERNS, which you can purchase from me:
To ensure that the top edge of the jabots and molds is perfectly even, do not forget about our “golden thread”, which I talked about in the 4th lesson:
When our molds and jabots are cut out of fabric, I process the longest side edge of the jabot with a HEEM SEAMLESS (can also be processed with a bias):
We process the remaining edges of these parts (except for the top) with BIAS TAPE, rounding the corners.
When all sides of the parts are processed, be sure to iron them and let the fabric cool for 15 minutes.
Now I mark on the block the middle of our lambrequin and its length (1 meter from the middle in both directions), since we will hang the lambrequin parts on the block in accordance with the given length, in order to sew the lambrequin not at 3 m and not at 2.10 m, and exactly 2 meters:
We take the already cooled parts of the lambrequin and mark folds on them, in accordance with our calculations in the second diagram:
When everything is marked, all that remains is to put folds on the parts, securing them with tailor’s pins:
After we have fixed all the folds with pins, we measure the length of our parts - it should correspond to the one specified in the diagram. It may happen that the length of the part is slightly longer than specified. In this case, we add excess to some fold or several. If the length turns out to be shorter, then on the contrary, we release the fabric a little at a time from the folds:
After we have made sure that the dimensions of the part correspond to the given ones, we fix the folds with a machine stitch:
Now all we have to do is hang the finished parts of the lambrequin on a block along a given length of 2 meters, this is what happened:
In order to secure all the parts of the lambrequin together, you need to sew a strip to the lambrequin hanging on the bar, with curtain tape or Velcro sewn to it so that the lambrequin can be hung on the cornice.
In this lesson I will tell you about the second method of making a strip for a lambrequin (I talked about the first method in lesson 8).
To do this, we cut a strip of fabric with a length equal to the length of the lambrequin + 6 cm for processing, and a width equal to the width of the curtain tape multiplied by 2, plus 4 cm for processing. The length of our lambrequin is 2m + 6cm = 2.06 m - this is the length of the strip of fabric we need for the strip for the lambrequin. So, since I have a curtain braid 5 cm wide, then multiplying by 2 and adding 4 cm, I get the width of the strip we need - 14 cm. And so, we cut a strip of fabric for our strip 2.06 m long and 14 cm wide, fold it in half along the entire length and iron it:
Don’t forget to iron the curtain tape with steam (it happens that it shrinks):
After this, we process the sides of the strip, already folded lengthwise, with a hem seam, and also fasten with a machine stitch the two edges of the strip along its entire length:
We sew a curtain tape (or velcro) to our strip, stepping back 1 cm from the edge, which is folded in half, like this:
We overcast the untreated side of the strip (where we fastened it with a stitch), leaving a distance from the edge of the braid within 0.5-1 cm in order to sew the strip to the lambrequin:
We remove our lambrequin from the block, pinned together with pins, and sew our strip to it. To do this, we fold the face of the lambrequin to the face of the strip (where there is no braid, it should be on top) and machine stitch it, like this:
Here's what happened on the inside of the lambrequin:
And this is the view from the face:
We turn our strip over so that both the lambrequin and the strip are facing you and lay a stitch, making sure to grab the curtain tape from the bottom with a stitch. If you can’t do it right away, then it’s better to outline first:
Here's what we got:
That's it, our lambrequin is ready, but before hanging it, you need to iron the strip, grabbing the edge of the folds a little, and let the product cool:
We hang our lambrequin:
Decorate with a flower:
We complement the flower with a garland of bells:
Our lambrequin is ready:
If you cannot make full-scale patterns of jabots and molds according to the pattern given in this lesson, then you can purchase these patterns (in full size) from me. Moreover, all patterns will be sent to you with the pleats already fixed by machine stitching, like this:
And you don’t have to guess at what depth and where to lay the fold. All you have to do is undo the stitching and cut out the part according to the finished pattern, and then mark on the fabric the location and depth of the folds in the same way as they are marked on the pattern sent to you. For this lambrequin, patterns of the following lambrequin parts were used:
COQILLIER No. 3, No. 4, DE JABOT No. 4, No. 5. To select and order the patterns you need, go to the pages: READY-Made PATTERNS and CONTACT.
I recommend: free video course “SEW BY YOURSELF.”


