Step-by-step instructions for assembling roller blinds
You can assemble curtains directly on a windowsill or table without any special tools or equipment, but this process requires care and precision. The sequence of operations for the most common open roller blinds is as follows:
- combine the right mounting bracket and the shaft control mechanism into one unit, connecting the plastic parts until they click;
- perform a similar operation with the left bracket, paying attention to the convenience of the location of the chain mechanism (it can be located either to the right or to the left of the plane of the blade);
- connect the left and right units to the shaft (should fit into the shaft splines without effort);
- insert the guide rings for the fishing line into the ends of the weighting material that secures the lower edge of the canvas.
When assembled, the canvas is rolled into a roll.
The material used ranges from completely transparent to dense. Even a beginner can perform these simple operations and assemble the curtain. All that remains is to install it on the window.
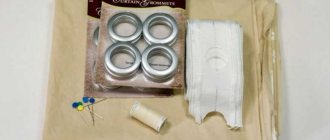
The package includes the required components, fasteners and instructions with pictures.
Note! You can find out all the nuances of assembling a roller blind of a specific model by using the included step-by-step instructions or by reading the recommendations on the manufacturer’s website.
Preparation
We decide what type of blinds we purchased: horizontal, vertical or roller blinds.
Horizontal blinds are called blinds with slats (slats) parallel to the floor and ceiling, vertical blinds are called blinds with slats perpendicular to them. Roller blinds are sun protection products that consist of a canvas (in most cases fabric) wound on a shaft.
It is necessary to take the measurements correctly, otherwise all the work will go down the drain. If you make a mistake and the lamellas turn out to be too long, then removing the extra lamellas will not be difficult, but on the contrary, you will hardly be able to add them if you have shortened more than necessary.
Installation of roller blinds on plastic windows
Installation of roller blinds on plastic windows is carried out using double-sided tape or self-tapping screws. In the first case, working surfaces should be thoroughly degreased.
Installation can be in the window opening, on the frame or simply on the sash. The last method is most often chosen.
In any instructions for installing roller blinds on plastic windows, the first and most important operation is marking the mounting points on the window frame. It is recommended to place the assembled curtain at the top of the frame and mark the location of the brackets with a pencil.
The installation process may vary slightly depending on the model.
All that remains is to fix the roller blind in the chosen place. For this:
- Brackets are attached to the frame (without drive mechanisms);
- drive mechanisms assembled with a shaft and a wound cloth are inserted into the brackets (until it clicks);
- Line tensioners are installed in the lower part of the frame;
- the upper ends of the fishing line are fixed in brackets, passed through rings on the weighting material and inserted into tensioners, forming guides for moving the web.
In the open position, the curtain fabric is wound onto the shaft; when closed, the curtain falls down thanks to the weight strip.
Sequencing
Roller blinds consist of a bracket, a control mechanism, a control chain limiter, a bracket area for fixing curtains, and grips. Some products are equipped with an additional system for fixing curtains, used for opening windows. First assemble the bracket. To do this, you will need to fix its constituent elements.
Assembly diagram for roller blinds bracket.
Double-sided tape is glued to the bracket. If installation work is carried out using self-tapping screws, then a platform is not required. The brackets are connected to the platforms until they click. To fix the parameters of the product, the structure is assembled on the windowsill. Then it is applied to the window sash. Use a pencil to mark the location of the right and left pads. The next step involves the final gluing of the platform to the sash.
Before carrying out this procedure, the surface is degreased. To do this, use alcohol or gasoline for lighters. Double-sided tape can only be applied once. If the right bracket is fixed, put the shaft on it. The fabric is wound on the last unit. The left bracket is attached to the structure. Make a mark of the location of the corresponding site. The left bracket is disconnected from the platform. The last element is glued to the window profile taking into account the marks made.
The shaft is inserted into the right bracket. The left analogue is fixed. The curtain comes down. The location of the magnetic clamp will need to be marked with a pencil. The curtain is attached to the sash taking into account the width of the fabric. If necessary, a specialist can take measurements.
How to disassemble roller blinds
To completely disassemble the curtains, you need to loosen and pull out the guide line from the tensioners and disconnect the brackets from the frame by tearing them off the double-sided tape or unscrewing the screws. After dismantling, you can change individual curtain components or install a new structure.
It is recommended to attach the curtain to the sash based on the width of the material.
Note! Double-sided tape is used only once; to re-fix the brackets, you will have to completely remove the old tape and thoroughly degrease the surfaces to be joined. Repeated unscrewing of screws negatively affects the strength of the fastening.
When installing curtains on glazing beads, the length of the screw should not exceed the depth of the glazing bead, otherwise the glass unit may be damaged.
Installation of horizontal blinds in the overlay
We measure the width and height of the window opening; the blinds should exceed it in these indicators by at least 3 cm or more.
If the blinds are mounted on the ceiling, measure the distance from the ceiling to the window sill.
Read also: Types of greenhouses with your own hands photo
If the window is flush with the wall, the handle may get in the way when opening, so you will have to use brackets. Make sure that they do not touch the mechanisms inside the cornice.
The tools you will need are a hammer drill or a drill and a screwdriver.
- We fix the brackets at the required height.
- Installing the cornice
- We mount the control handle.
- Checking the result
How to remove roller blinds from a plastic window for washing
In order to remove the fabric for washing, it is absolutely not necessary to completely dismantle and disassemble the curtain. It is enough to disconnect the guide line and pull out the drive mechanism along with the shaft and the curtain. To do this, you need to lightly press the screwdriver onto the latch, which ensures that the two parts snap together.
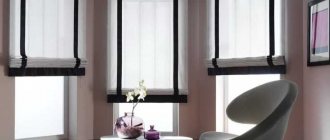
Roller blinds, often used in modern interior design, are easy to care for and use.
Note! After washing, the curtain should be lightly ironed, but under no circumstances should it be wrung out.
Curtains from Delfa for all types of double-glazed windows
The Belarusian-German enterprise Delfa produces roller blinds of the “Mini” series for all types of niches and double-glazed windows: both windows and doors. The roller blinds are supplied with strings with lower tensioners. This design allows you to fully use the curtains in ventilation mode, with the window open.
A low price is not always a sign of low quality goods: curtains from Delfa are proof of this
According to the manufacturer, certified materials guarantee the color fastness of the fabric and the fabric does not fade in the sun for a long time.
This is a more budget option, since the material contains inexpensive polyester. The fabric allows light to pass through but retains heat.
What are the mistakes when installing and assembling roller blinds?
One of the common mistakes when installing roller blinds is the discrepancy between the type of fastener and the actual load and temperature conditions. Therefore, it is recommended to use double tape only for fastening lightweight structures in rooms with relatively stable temperature and humidity.
Mini-curtains are usually installed directly on the window sash using double-sided tape.
The vast majority of curtains have all components made of plastic, not metal. Therefore, you should not make significant efforts when assembling the curtains. If the parts do not fit together, it is better to double-check that the installation is correct rather than try to connect them by force.
They are very convenient and suitable for decorating any windows.
Errors in marking the installation locations of the mounting brackets lead to the fact that the curtain does not completely cover the sash or window, which completely eliminates all its advantages.
The level of light transmission of the canvases is selected depending on the location of the windows in the room.
How to replace mini roller blinds (video)
Roller blinds from the “mini” series do an excellent job of protecting rooms from bright sunlight, and also help protect against high air temperatures on hot summer days. Fastening the mechanism takes no more than 15 minutes. They will be a complete replacement for long, heavy curtains, but at the same time they look great in a duet with them.
After purchasing blinds, the question arises of how to install them. In principle, you can turn to professionals, they will do everything quickly and efficiently, but of course not for free. If you don’t want to spend money and you think that you can handle such work yourself, then this article is for you.
I draw your attention, try to evaluate your strengths and capabilities without emotions, pragmatically and calmly, otherwise you may ruin the purchased blinds and damage the window.
Installation of horizontal blinds on PVC brackets
You will need a screwdriver and wire cutters
- Using a special screw, we connect the PVC bracket to the universal bracket.
- Take a piece of cable of the required length and secure the upper cable clamp with a screwdriver
- We pass the cable through the cornice and slats
- We install PVC brackets on the cornice and attach it to the sash of the plastic window. We tighten the cornice with a special wrench from the fastening kit.
- Installing PVC brackets for the bottom of the window
- Pass the cable through the clamp in the bottom bracket and tighten it
- Now all that remains is to install the control knob and check how successful the installation is.