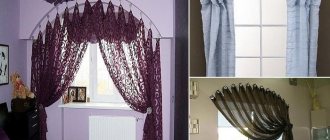
Roman blinds are a sheet of fabric that, when lifted, gathers into wide folds falling on top of each other. When sewing a curtain, pockets are made in it for guides. Rings are sewn on the wrong side through which ropes are passed. They raise and lower the canvas. The distance between the folds is 20-30 cm.
Roman blinds in a dark shade for the living room
Curtains come in two types: classic and cascading. When closed, the classic version turns into a smooth canvas, while the cascade version retains the folds. Roman blinds are a beautiful and functional curtain that is suitable for any room, style, or window. The choice of fabrics for sewing is not limited, but depends on the purpose of the curtain. The second name for Roman blinds is Roman blinds.
How to attach Roman blinds
The choice of how and where to attach Roman blinds depends on the owner’s desire to have the window sill freely accessible or to hide the defects of the window opening (scratches, uneven slopes) behind a single sheet. Due to the mobility of window mechanisms, it is necessary to make as many fasteners as there are sections to be curtained.
If the goal is to hang a large one-piece curtain, it is recommended to do this just above the window opening or on the ceiling.
When attaching a Roman blind to a window sash, the window sill remains free even when the curtain is completely lowered
When mounted on a wall, the window sill is accessible when the curtain is raised fully or partially
How to choose a mounting method
There are three ways to attach Roman curtains: to the cornice, to the wall and to the ceiling.
When deciding on a specific option, you should focus on several factors at once: the dimensions and shape of the window opening, the features of the paintings and the overall design of the room. When is one or another method of fixing decor appropriate? On the cornice: in the opening - if it is necessary to leave the window sill easily accessible so that it can be used for various household needs even with the curtains drawn, or if the window is located in an inconvenient area and there is no space above it to fix the cornice; above the opening - if there are several windows of different formats in the room and they need to be brought to a single style, and also if the cornice itself fits into the overall concept of interior design.
The choice of method for attaching Roman blinds depends on factors such as the type of room, its size, ceiling height and even appearance
To the wall: if the task is to close the entire window opening in order to divert attention from the frame or to disguise any defects, for example, poor-quality slopes.
To the ceiling: if a wide and elongated Roman blind is used, if a large window is designed, if there are two openings on one wall at once.
Window mount
You can attach curtains to the window using a smaller version of the cornice. It is usually taken in the same place where the main purchase is made - according to the size. It looks like a plastic, aluminum, steel profile, which is equipped with a height adjustment mechanism (special cord) and a control unit.
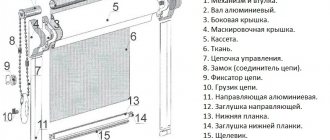
The curtain rod for Roman blinds consists of a body, lifting and pulling mechanisms
There are two main ways to install curtain rods: using drilling holes to install holders, and without it (using additional fastening elements). The material itself is attached to the profile using Velcro tape, so removing the curtain for washing or replacing will not be difficult.
Use adhesive tape to secure the curtain fabric to the curtain rod body.
You can attach a mini-curtain to a movable sash without drilling the frame using special brackets
Fixation on the cornice and types of cornices
A special profile for Roman blinds contains a system of ropes or ribbons and a control unit. The curtain is attached to the profile with Velcro tape, the soft part of which is always sewn to the material.
The Roman blind is attached to a plastic window using three types of lifting mechanisms. Installation begins by selecting its type:
High quality cornice
- Rope (cord) – ropes are inserted into the rings of the fabric, used when the product weighs up to 4 kg;
- Chain-rotor - the fabric is lifted by narrow belts fixed in special blocks. The profile is suitable for heavy curtains;
- Cornice with electric motor - controlled by remote control.
Depending on the size of the product, dimensions and shape of the window, Roman blinds are installed on one of the following types of cornice:
- Classic – suitable for installation on any surface;
- Mini - system reduced for plastic sashes;
- Bevel – suitable for irregularly shaped windows or sloping surfaces.
Installation steps
Installation instructions are included with each profile. Installation includes standard steps:
- Make markings for the fasteners and install them
- Place the cornice, unravel the ropes or ribbons from the lifting blocks of the chain-rotor profile
- Align the tape sewn to the fabric with the curtain rod
- Turn the profile over along with the canvas, thread the ropes into the rings
- Tie the ropes in knots on the bottom row of rings
- Insert the lifting system into the installed mountings
Mounting to wall, ceiling
If you understand how Roman blinds are attached to windows, then it will be easier to understand how to hang them on a wall or ceiling. After all, the diagram is the same, only the cornice is longer, it is usually 1.1 - 2.5 m. Because of this length, it is necessary to drill holes for fasteners not only at the edges, but also in the middle.
Wall mount is suitable if you need to hide window slopes or visually increase its size
You need to do the following:
- Make level marks in the places of future fastening so that the ends of the cornice are at the same distance from the window opening.
- Depending on the wall, a hammer drill or a drill with a hammer is used to drill holes.
- Dowels are inserted into the resulting recesses, a profile is applied, and tightening screws are inserted. It is recommended not to tighten the first two completely; tighten everything only after each element has been seated.
- All that remains is to insert the cornice into the fasteners.
Installation diagram: 1 – fixing the bracket to the wall; 2 – securing the housing in the bracket
It is important to understand what the wall is made of before you begin. If there is plasterboard sheathing, you will need a special dowel and longer screws to ensure that the curtains are securely fastened.
For installation on drywall, use a butterfly dowel - plastic or metal, depending on the weight of the curtain
List of tools for installing curtains:
- level;
- pencil for marking;
- roulette;
- drill or hammer drill;
- screwdriver (you can use a screwdriver, but this is less reliable);
- additional screws, dowels, in some cases.
Note! It is important to read the instructions before installation; some materials and projects require a special approach.
Curtains are often hung from the ceiling in the same way if, as the designer intended, they go along with curtains. It looks interesting and modern.
Mounting diagram of the bracket for the ceiling method of fastening the curtains
How to properly hang a Roman blind on a window
Craftsmen do not recommend drilling holes in the window profile, because in the future, if the interior changes and the cornices are removed, unsightly holes will remain. These consequences can be partly prevented if you think in advance about what mistakes to avoid: you can install fasteners on the opening sash differently.
To attach a Roman shade to a window, use the same brackets that are designed for wall mounting
What rules should not be broken in any case:
- Attach the cornices with incomplete self-tapping screws. Since this violates the installation technology, it can weaken the structure. This is if it was already decided to drill.
- Do not use “foreign” curtain rods: the profile is too long, as this will interfere with the window closing, or it will not open at all. It can also ruin the whole look. And an excessively short cornice will not fulfill its functions.
- Do not neglect checking the building level.
- You should not try to fix the curtain without a special cornice: a stapler and wooden blocks will ruin the impression of the new thing.
A special cornice is equipped with everything necessary for assembling and installing a Roman blind
How to install a curtain on an opening window sash
When installing a cornice on an opening window sash, drilling can be avoided. Using additional holders would be the right decision, as it will allow you to preserve the appearance of this part of the profile longer.
Compact models of curtains on mini-cornices with a flat body of small thickness are designed for movable window sashes
Scheme for installing a Roman blind on a swing-out shutter
- Self-attaching holder. You need to take screws and nuts and fix the curtain brackets to the fasteners. Connect to the cornice. Place the resulting structure on the frame using stable plastic hooks. You won't need any other tools here except a screwdriver.
An example of fastening a light curtain using a spring bracket
For flaps, models with a guide string are best suited, thanks to which the curtain fabric adheres to the window in ventilation mode
The string is fixed on the sash using special holders included in the curtain kit
Such parts can be purchased in online stores or at other points of sale of Roman blinds. They come in two pieces in a pack, which is enough for one sash. If there are several windows with opening compartments in the room, then it is worth ordering the required number plus one (as a reserve or in case of breakdown or defect).
How to make a cornice for Roman blinds
To attach curtains to the window, there is no need to buy a ready-made cornice. If desired, you can easily do it yourself. First of all, you need to prepare all the necessary tools and parts for the future cornice.
We will need
- A beam, the width of which will correspond to the width of the finished curtain, the section of the beam is chosen based on the weight of the entire product;
- To decorate the cornice, varnish, paint, fabric and a brush are prepared;
- Screwdriver, screws themselves and drill;
- Adhesive tape (as in the factory version). With its help, the canvas will be attached to the cornice;
- To secure the tape to the cornice, choose assembly adhesive, a construction stapler or small nails, as desired.
- Tape measure and pencil;
- In hardware stores you can find self-tapping screws with rings instead of caps, these are exactly what we will need;
- Holder for winding rope.
Manufacturing process
- First of all, it is necessary to decorate the timber. You don’t have to do this, but for a more aesthetic look, it’s still worth it. We paint it, varnish it, some prefer to wrap it with fabric, which is subsequently secured with a stapler.
- Markings are made for fasteners.
- Velcro, or rather its hard part, is fixed in the upper part of the beam.
- A canvas with rings for ribbons or ropes is applied to the beam from the inside. Each ring is marked with a pencil, after which screws with rings are screwed in along these marks.
- We connect the canvas to the beam using Velcro.
- On the back side of the curtain we thread the rope through all the rings, including the rings on the screws mounted in the cornice. We assemble them from one side, while the outermost rope needs to be threaded through all the screws, and the middle one is threaded through the last one.
- We attach the beam to the frame using screws. It must be attached to the top of the frame to maintain the tightness of the window.
- We install the rope holder on the side where the ropes themselves come out. This ensures the canvas is fixed.
Important! For more comfortable operation of the product, it is better to purchase a rope connector in a store. In this case, the curtain will be fixed automatically in the desired position.
Installation recommendations
Expert opinion
Romanova Ksenia Petrovna
Interior design expert and fabric store manager
It is recommended to read the instructions on how to properly handle the device, so that in the event of a breakdown, you can repair it under warranty. After all, if violations are detected during operation, the owner will repair the product at his own expense.
The Roman blind is controlled using a chain mechanism that can be installed on the right or left, if the design allows it
You should also not place much hope that the fastenings and cornice will be reliable if the packaging indicates a manufacturer with a dubious reputation and the price is below average. A high-quality product is not sold at a low price; this is against the rules of trade.
The choice of where to attach the Roman blind is based on the design approach to window design
Expert advice: how to secure the Roman blind design for a long time:
- Reliability of the structure can be achieved if the bolts and screws are tightened properly, preferably using a screwdriver. If it is not available, a screwdriver will also work, only then you will have to make physical efforts. After all, loose components spoil the system and reduce its service life.
- Also, if the owner lacks confidence in his abilities, as well as experience in installing durable Roman blinds, it is recommended to turn to professionals for help. This is not an expensive service, but the reliability is worth it. After all, a specialist will probably take into account all the nuances, take specialized tools with him and do his job as well as possible.
How to attach Roman blinds to plastic windows? All fastening methods, step-by-step installation
Roman blinds are an interior element used by man for more than 2000 years. They appeared in Ancient Rome for protection from sunlight.
Some researchers believe that such structures were used to create shade in the Colosseum. The modern market offers a huge assortment of Roman blinds of different textures, shapes, and colors, which provides an opportunity for experimentation.
You can attach the product to a window or cornice yourself; you can learn how to do this from the article.
Let's talk about types
The popularity of Roman blinds is the reason for the emergence of several of their varieties, which are determined by the shape of the folds when raised.
Classic Roman blinds are the most common type. When “unfolded” they are perfectly flat and completely cover the space; when “folded” they form neat folds. Fabric folds are formed using flexible cords.
Frameless Roman blinds differ from the previous type in the absence of cords, so when raised they form even, but sagging folds. This type, when raised, resembles a lambrequin.
Even when unfolded, cascading curtains form folds that are arranged horizontally and evenly.
Classification of Roman blinds
All models can be divided into three main categories:
- Classic . When unfolded, they look like an absolutely flat heavy canvas. When folded, wide and even folds are formed, falling down. In both states it looks very harmonious. Most of all, such curtains are chosen for kitchens, where ordinary curtains are not always appropriate.
- Cascade . Both assembled and lowered, they are decorated with neat flowing stripes. This composition looks elegant and is suitable even for bedrooms, living rooms, and halls.
- Frameless . There are no stiffening ribs in the design, so when closed the curtains hang down beautifully in an arc. They will look best in a room where there are similar types of curtains or curtains.
The design of a Roman blind is very simple: slats are fixed on the reverse side, and the lower edge is decorated with a weighting material. To close or open it, just pull the cord, which activates the lifting mechanism.
What you need to prepare before attaching Roman blinds to plastic windows
Attaching the product is not difficult, but this process begins with preparing all the necessary materials and tools.
The standard set is:
- Roman curtains;
- screws, dowels, self-tapping screws;
- cornice;
- building level;
- roulette;
- bracket;
- perforator;
- screwdriver.
Before nailing the cornice, you need to mark the wall; for this you need to stock up on a pencil, pen or chalk. Please note that curtain rods are not always sold with Roman shades. If you need to order a cornice, be sure to measure its length.
Design and mechanisms
In addition to the material and types of fastening, you should know about the existing mechanisms for raising and lowering curtains.
- Plank construction. The most budget-friendly model of Roman blinds, which is easy to make with your own hands. To do this, hooks are screwed onto a baguette with a diameter of 10mm-15mm, which will control the operation of the ropes responsible for raising and lowering the curtains.
- Rotary chain mechanism. To operate, a special axis is installed on the longitudinal protrusion above the window, which is responsible for the operation of the blocks. The blocks, in turn, control the raising and lowering of the ropes. This design makes it possible to fasten Roman blinds at any height. During operation, the rotor-chain mechanism is durable and strong.
- Rope construction. This mechanism is only suitable for curtains made of thin fabric. Since when using a rope mechanism with a dense fabric, the rope that is used for lowering and raising will break very quickly.
Roman curtains in the interior: photos and classification
Modern designs are applicable to all kinds of design ideas. There are two main types:
- classic;
- cascading.
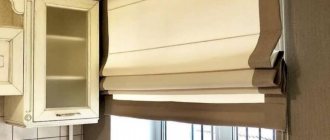
The first option is smooth canvases that form horizontal folds when raised. Here are some photo examples of classic Roman blinds for the balcony:
Brown color perfectly protects from the hot summer sun
Choosing to match the wallpaper, elegant and beautiful
With an original design that emphasizes individuality
Transparent option with decor - lightness and elegance
The cascade subtype has folds in the open position. The cascade goes from top to bottom, creating unique lines and a feeling of airiness. The devices are applicable in classic interiors, in Country and Art Deco styles.
Here are some examples of modern Roman blinds for the kitchen: photos of interesting design solutions.
Good combination with wooden furniture
Classic in everything
Combination of colors of curtains with furniture elements
Even a small window opening will look elegant
Roman blinds are also classified according to the design features of the lifting mechanism:
- Rope models. Transparent or translucent fabrics with lightweight material are used, this makes it possible to easily control the curtains using ropes.
- Rotary-chain . Similar in principle to blinds. By pulling the rope, the rotary shaft begins to work and the rotor beams move. It is possible to use not only light fabrics, but also dense fabrics, since the construction is strong.
- Combined model. Mounted to accommodate multiple fabric options. Several rope and rotary-chain mechanisms are used simultaneously.
- Elementary option. Rarely used, as it is not very durable. Ropes tie the sticks together and lift them up. The positive side is the affordable price.
Here are various examples of photos of Roman blinds on plastic windows:
A stylish geometric print complements the design of the entire room.
Vertical stripes look modern in any room
Stylish option for the kitchen
Children's dreams
A few words about care
Over time, Roman linens, like all fabrics, need to be cleaned. Before assembling the Roman blind and removing it for washing, the drapery should be vacuumed on low or brushed to remove dust.
Depending on the fabric from which the curtains were made, they can be washed, ironed and even bleached. The canvases are removed from the cornices and cleaned depending on the rules for using the material.
The process of installing Roman blinds is not a very complicated matter, so you don’t have to seek help from a drapery fastening specialist, but do the fastening yourself.
Dimensions
There is a large assortment of curtains on sale, so you can really choose the most suitable ones based on the size of the window. Modern double-glazed windows are made to individual sizes, and the openings, for the most part, are far from standard. If it was not possible to select ready-made roller blinds to fit the window size, there is an option to order their production from a specialized company; in this case, the measurements are taken by a specialist. The stores offer the following size range.
- Length – 160 cm, 175 cm, 220 cm (most frames correspond to this length).
- Width - from 30 to 140 cm (with the typical width of the sashes it is much more difficult; they make both narrowed and enlarged openings).
Thanks to the Internet, you can easily choose a curtain of the right size and price category by going to the catalog of any large store. You won’t need to travel and wander through the aisles for a long time when you can actually choose the most suitable option while sitting in your favorite chair.
The video shows how to measure closed roller blinds:
Installation Instructions
When installing curtains using a curtain rod, you will need tools - a drill or screwdriver, a tape measure and a pencil. These instructions are suitable for installing a cornice directly on the frame of a plastic window, and when you need to attach it to a wall or ceiling.
To install the curtain rod:
- Using a tape measure and a pencil, mark the space required to attach the cornice. When you need to attach a curtain to the wall above the window opening, then draw a line parallel to the window sill. If the cornice is attached to the ceiling, then the installation of the cornice should be flush or parallel to the edge of the window opening. When installing a double Roman blind, you need to mark the attachment points, taking into account the width of the double cornice.
When placing a double Roman shade, more space will be required, so it is better to attach a double Roman shade to a wall or ceiling.
- Using a drill, drill the necessary holes in the fastening points (in the wall - if the cornice needs to be attached to the wall, in the ceiling - if it is attached to the ceiling, or in the frame of the window frame closer to the outer corners - if the cornice is installed on the frame of a plastic window).
- Use self-tapping screws to attach the brackets. Ready-made curtains with chain or rope lifting control mechanisms are supplied with brackets in the shape of the letter “L”.
- Secure the assembled curtain to the curtain rod according to the instructions using special clips or Velcro.
If the curtains are easy to raise and lower, then everything is done correctly. To check this on curtains with manual or mechanical lifting, you need to pull the cord or chain, lift the curtain to the desired height and fix it, moving the control thread or chain to the side.
The curtain should be fixed at the desired height exactly horizontally. To lower the curtains, also pull the cord to the side, the locking mechanism will release the fabric, and you can continue to move the curtain up or down along the window.
Expert opinion
Romanova Ksenia Petrovna
Interior design expert and fabric store manager
When using a special curtain rod for double Roman blinds, make sure that both panels are lifted independently from the same lifting mechanism. This mechanism is designed to lift each panel separately.
If the lifting mechanism is electric and you are not confident in your ability to assemble the cornice according to the instructions, then it is better to entrust the installation to a specialist.
Nuances of consolidation
If you have never encountered installing a Roman blind or have sewn it yourself and want to install it yourself, then you need to take into account certain tricks for securing this type of curtain:
- The top of the canvas, when assembled, has a “dead” zone, since the fabric is not collected under the very eaves, as, for example, with horizontal blinds. And this strip of fabric can get in the way when opening the windows. Therefore, when marking for installing the cornice, you need to take into account the measurement of the distance from the top edge of the window, equal to the width of the fold, and move this distance upward when marking.
As an alternative for such window openings, you can choose to place the curtain on top of the window sash or attach it to the ceiling.
- To fasten the curtain rod to the window frame, most often you need to fasten it with self-tapping screws. And in this case, the integrity of the plastic window is violated. You can use other options - adhesive tape, double-sided tape, but these fastening options are short-lived compared to screws.
- When installing, correct window measurement is very important. Before purchasing or sewing, you need to decide how you will hang the curtain - inside the window opening or on the wall, blocking it. For any type of installation, you need to take measurements - accurately measure the width and height of the window opening or the window itself, or its sashes.
The width needs to be measured in three places: top, bottom and middle. The width of the curtain should be no wider than the smallest of these three sizes. Then the curtain will move freely even in the window opening.
- If you have sloping windows, then the curtain can be attached both inside and on top of the window opening.
- Use the appropriate type of fastening depending on all the factors of your room and window.
- Decide on the style of the room, the purpose of the curtains, and their number for one window. Take into account the width and weight of the fabric, take the necessary measurement of the window opening and choose the required type of fastening of the curtain to the window - on the frame or in the window opening, on the wall or on the ceiling, with or without a cornice, double cornice or regular, with what lifting mechanism - manual, mechanical or electrically driven. For each curtain option, the best mounting method is suitable.
There are many options for window design using Roman blinds - the choice is yours.
To learn how to properly install Roman blinds, watch this video.
Features of fastening Roman blinds
Roman blinds can be attached to three bases, depending on what purpose is being pursued. To hide from your own and other people’s eyes all the defects of the window opening and the windows themselves (crooked slopes, scratches on the glass, window sill, etc.), the best option would be to attach the curtains to the wall above the window opening or to the ceiling.
Before attaching roller blinds to plastic windows, you should definitely take all the necessary measurements.
To ensure that the window sill always remains in the public domain, it is better to choose a window mount.
To the window
“How to install Roman blinds on plastic windows” is a fairly common question among people who, without looking, grabbed the first model of curtains they came across in a store, and at home, having unrolled and examined it, realized that they did not understand at all how to deal with it and what where to hang it.
Installation without drilling
If you want to attach curtains to the sash or frame of a plastic window, you do not need any additional equipment for this. The decision to drill through a PVC profile is fraught with either complete disrepair of the window group or loss of tightness, which will also not make you happy.
Therefore, in order to secure ready-made Roman blinds to the windows, you need to use adhesive tape, which must be included with the store kit. If you want to decorate the window with self-sewn curtains, then purchase double-sided tape and hang the product on it.
The main thing is that the structure is made of lightweight fabrics, otherwise the adhesive base may not hold up and the blinds will simply fall off.
The method of attaching it with glue is quite simple. You need to glue one piece of adhesive tape to the plastic sash, and sew the second (if the manufacturers have not done so) directly to the blinds. After this, the canvas is leveled and the Velcro is firmly pressed against each other. The blinds are fixed and the whole process took no more than 10 minutes.
Fixing to the bar with adhesive tape
Making a cornice
To attach a Roman blind to a plastic window, it is not necessary to purchase a ready-made mechanism or have a mounting strip. You can make it yourself.
Before work, prepare the necessary materials and tools:
- Beam - the cross-section depends on the weight of the product, the width is equal to the size of the finished curtain;
- Paint, brush, decorative fabric for timber - optional;
- Drill, screwdriver, screws for securing the timber;
- Adhesive tape – secures the fabric to the beam;
- Construction stapler, small nails or glue for fixing the adhesive tape on the beam - optional;
- Pencil, tape measure;
- Self-tapping screws with a ring for holding ropes - their number is equal to the number of ropes. These are a special type of screws that are sold in hardware stores;
- Holder for winding ropes.
Making a cornice on which you can hang Roman blinds on plastic windows has the following steps:
- If desired, paint the timber in the desired color or cover it with fabric, securing it with a stapler;
- Make markings for the mounting screws;
- The hard part of the Velcro needs to be attached to the block closer to the top edge, the mounting holes are marked under the tape;
- Attach the top row of rings sewn to the fabric to the part of the block that looks into the window sill, and mark the block for self-tapping screws with rings. Marks are placed in the center of the curtain rings;
- Screw in the screws with the rings;
- Connect the sticky parts of the fabric and the timber;
- Turn the product over, insert all the cords into the rings on the fabric, pass them through the rings of self-tapping screws, and assemble them on the right or left. The rope from the far row is pulled through all the screws with rings;
- Attach the beam with the curtain. Plastic windows are drilled in the upper part of the frame so as not to break the seal;
- Install a rope holder on the side of the frame to secure the canvas.
Tip: Buy a special rope connector with a built-in lock to secure it to the bar on the control side - the curtain can be fixed automatically.
If you need to install Roman blinds on plastic windows in this way, but without drilling, then the beam is glued to the sash with Velcro. A special tape with an adhesive base or double-sided tape will do.
Main characteristics
Varieties of Romanesque style models with a lifting mechanism:
- Classic. They consist of a continuous textile element, which, when lifted, forms uniform horizontal folds in the lower part. This model is most often used for interior decoration. Curtains are mounted on a frame consisting of tubes, slats or plates.
- Cascade. The defining feature of the design is the folds of the material that form even if the fabric is unfolded. The cascade model is considered a more elegant and elegant option, relative to the classic one.
- Frameless curtains. No slats are needed for sewing and hanging. In this version, folds are formed on the sides with “ears”. The frameless model was the very first to be created and became the prototype for the creation of the Roman classical curtain, but these days it is used less often than other types.
Romanesque style cascading curtains.
Step-by-step installation
1. We determine the method of fastening and decide where exactly to install the canvas (outside or inside the opening); 2. If the Roman curtain is mounted inside the structure, it is necessary to measure the window opening correctly on the eve of purchase;
3. Correct transverse measurement is carried out in three positions: upper, central and lower.
8. To protect children from possible injury, special latches should be installed.
9. We mount the assembled system into the mounts that we installed earlier. To protect children from possible injuries during operation, special latches should be installed.