What it is
Tatyanka skirt is a wide, fluffy skirt with gathering made of various materials and trims, which is attached at the waist with a yoke or elastic band. The style has existed for a very long time and has not at all lost its relevance and need among women of all ages. The skirt has a very interesting name, but no one knows where it came from. According to the most popular version, the model got its name thanks to the main character of the novel “Eugene Onegin”, Tatyana.
The “Tatyanka” model is very similar to the half-sun, flared sun.
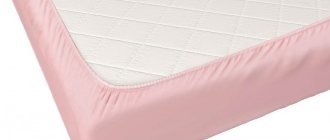
Tatyanka skirt with yoke
Often the “tatyanka” is made with a clasp.
This way it fits better and is much more comfortable to put on. Important! The zipper can be located either at the back or on the side. If the fabric is thick, it is recommended to make a fastener at the back, but if you are sewing from a thin material, make a seam on the side.
Skirt pattern
You will need to take only two measurements: waist circumference and the desired length of the “tatyanka”. Everything else, as in the previous version, can be cut directly onto the fabric.
We sew a Tatyanka skirt without elastic
Follow these steps when sewing.
- Fold the fabric in half. Open out the main panel of the skirt. You should end up with a rectangle. It is equal to the length of the skirt.
- Open the belt. Its length should be equal to the waist circumference + 10 cm.
- Make a lining. Fold the fabric in half.
Important! The length of the lining should be less than the length of the main fabric so that it is not visible.
- Fold both rectangles of the main fabric and sew a side seam on the machine. The seam should be up to the zipper. Sew the edges with an overlocker. Insert a hidden zipper into the unstitched part.
- Make folds to suit your taste. Each fold is three layers of fabric: the face and what goes inside. Pin together.
- Glue interlining to the wrong side of the belt. This is not necessary, but it will prevent the fabric on the belt from stretching.
- Sew the edges of the waistband: turn it inside out and machine stitch it, securing it at the beginning and end.
- Sew the lining for the skirt in the same way as the main fabric.
- Sew all the details and finish the edge at the bottom.
“Tatyanka” on the clasp is ready!
Important! The “tatyanka” itself is very fluffy, so it is best worn with tight-fitting clothes on top. This could be a turtleneck or a T-shirt that fits close to the body. A bodysuit would also look good with this skirt.
Who to wear
Although “Tatyanka” is positioned as a universal model, it is not suitable for all body types. For example, ladies with inverted triangle, rectangle and hourglass silhouettes will perfectly highlight their assets thanks to this style. And all because of its flared cut, which visually reduces the waist and emphasizes the hips, smoothes them and makes them more feminine.
However, girls with apple and triangle shapes are not recommended to wear such clothes, otherwise this cut will not only visually make the bottom heavier, but will also add a few extra pounds to you, which you obviously won’t be happy about. In this case, it is better to look at less voluminous models.
How to sew a children's half-sun skirt without measurements
So, we measure the circumference of the waist directly with an elastic tape, pulling the tape a little (but at the same time make sure that it does not squeeze too much!), Cut off the required amount, taking into account the seam allowances. We sew the elastic band into a ring and sew it to the skirt. Seam allowances should be pressed onto the skirt and processed using an overlocker or sewing machine with a zig-zag stitch.
We make a belt from the same fabric and insert it into the loops. Skirt and shorts are ready!
Found unfamiliar words? Then take a look at the master's dictionary and the definition of sewing terms.
Wrap an elastic band around your child's waist to find out the finished length. Machine the ends of the elastic band together.
A piece of fabric must be folded edge to edge in half so that the right side is on the inside. The edge can be pinned together; if you are a beginner, then this step will definitely not be superfluous. Now you need to set aside the length, adding an allowance of about 5 cm for the hem, as well as an allowance on top for attaching the waistband of about one and a half centimeters.
When you have chosen the fabric for the skirt with an elasticated belt, you need to cut it out; for this there is no need to create separate patterns and take measurements, because we are sewing the simplest model. The fabric must be folded in half so that the front side is inside, measure the required length of the product, leaving a few centimeters at the bottom and top for hemming. The width of the canvas should be slightly larger than the piece of elastic.
More homemade products: How to crochet a frog, pattern for beginners - with photos
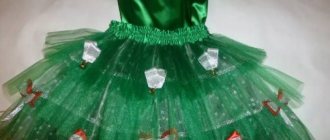
A half-sun skirt with an elastic band is a little more difficult to cut , and you can also crochet a half-sun skirt, as shown here. This is a very interesting model for little fashionistas; for example, it can be an addition to the “Snowflakes” costume at a New Year’s party.
Models
With elastic band
The most convenient and versatile option, which is most suitable for summer walks. Nothing restricts movement. “Tatyanka” with an elastic band is often worn either by children or young people who value comfort and convenience. Therefore, this skirt is used as a school uniform.
This style is especially easy to sew, since the elastic can allow you to make a mistake in the size, and then correct everything. Therefore, novice needlewomen are recommended to use this option.
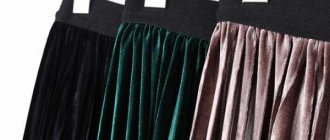
With pleats
The model is very curvy, and all because of the gathers that come from the wide belt. This style looks very nice in midi or mini length and in combination with sandals. For production, easily draped and lightweight fabrics are used, for example, cotton, chiffon, thick knitwear. The number of folds depends on the choice of material and the sewing method.
On the yoke
The traditional “tatyanka” comes with a wide, rigid yoke belt. Thanks to the rigid, fixed belt, the waist is visually reduced, and then a smooth transition to the hips begins. The pleated style smoothes out all the angular features of the silhouette and makes it more feminine and graceful.
The skirt can be used both to create a business look and a romantic, evening look. The fabrics used are different, but basically they are all dense, which is what makes a fuller skirt. For a change, you can wear a contrasting strap that will liven up your look.
Sew the belt to the product
First you need to build the belt itself. To do this, you will need to cut a strip of fabric, the length of which is equal to the waist circumference, and also add three centimeters (1.5 cm on each side for the seams and stitching at the back of the zipper). The waistband width is double the width and seam allowances. Thus, if the finished width of the belt is three centimeters, then the width of the required fabric is 8 centimeters (3 centimeters for double width and 1 centimeter for allowances).
Any fabric stretches over time. To prevent this from happening to the skirt, the belt fabric needs to be duplicated. Dublerin is an adhesive fabric that needs to be glued to the waistband of the skirt. You can also use interlining, but it is more suitable for thin fabrics.
To begin, we cut out a strip of dublerin equal to the belt. We apply it with the adhesive (rough) side to the wrong side of the fabric. Cover the belt with a cotton cloth and steam well with an iron. After the dublerin is glued, fold the belt in half (with the right side of the fabric facing out) and iron it.
After this, you need to process the belt on one side with an overlocker.
We apply the raw edge to the assembly. We connect the edge of the belt and the edge along the back cut (on the front side), attach with a pin. We repeat this first from the other end of the skirt, and then pin the belt in the middle and along the entire length. Then you need to give a line at a distance of one centimeter from the edge.
The next stage is attaching the zipper. To determine the level of indentation at which you need to make a zipper, apply its middle to the seam and see how the zipper is positioned. The edge of the seam allowance should match the edge of the zipper (sometimes it can come out: it depends on what the seam allowances are). After that, we put the zipper on top. The dog should reach the bend of the belt (we ironed it). Then we pin the zipper along its entire length with pins. It is important that the cuts along the seam of the belt stitching on the wrong side are tucked towards the belt.
Unzip the zipper and stitch it on one side (fixed) to the skirt.
Afterwards, close the zipper and apply it on the other side. Care should be taken to ensure that the stitching seam of the waistband matches on both sides. To do this, you need to pin the zipper at the same distance from the edge of the fabric at the place where the belt is stitched (after pinning, check on the front side to see if the line matches and there is no skew). If everything is correct, unzip the zipper and stitch it on the other side.
All that remains is to process the edges of the belt. Along the fold, turn the belt inside out (the tail of the zipper should be visible), and pin short sections of the belt across. A little closer to the edge (not along the line of stitching the zipper) we add a line. We repeat the same with the other edge of the skirt waistband.
We fasten the zipper and check that both ends match.
Sew the belt to the skirt. To do this, we tuck all the seams inside (along the assembly line) and cover them with a belt, pinning them along the entire length.
Lastly, you need to sew a seam along the front side of the fabric along the line of sewing the belt to the skirt.
How to choose fabric
First, you should decide what the skirt is needed for and for what period of time. After all, lightweight materials will be preferable for summer, but for winter it is better to choose warm, dense fabrics. It is also worth considering that the denser the fabric, the more difficult it is to process.
- Cotton. A universal, natural material that is perfect in the summer. And all thanks to its properties: good breathability, hygroscopicity.
- Viscose. Among the advantages: price, light viscose drape, creates a spectacular appearance. Disadvantages: synthetic, can stretch after long use.
- Silk. One of the best fabrics for a summer product. Not only will it prevent you from sweating on a hot summer day, but it will also highlight your figure in a beneficial and effective way with shine.
- Chiffon. It drapes easily and is ideal for summer. However, the transparency of this material will not work in your favor. You will have to make the skirt multi-layered, which means it will be very hot in it. Choose chiffon that contains both synthetic and natural fibers. Chiffon makes good summer clothes that are pleasant to the body in cool weather.
- Gabardine. Elegant, warm and practical fabric that will perfectly decorate your look. Most often, business clothes are sewn from gabardine.
- Fatin. Lightweight, mesh fabric that can be used not as a base, but as an addition to your skirt. Tulle makes ideal curvy models.
Cotton
Silk Chiffon Viscose
For winter, choose wool or knitwear. However, you will have to work hard with the first material. For decorative finishing, use lace, elastic ribbons, etc.
Which fabric to choose
The fabric for sewing the product can be almost anything from leather and suiting to cotton, mesh and transparent.
You may be interested in this: Constructing a pattern and sewing an alphabet from felt
Satin skirt
Important! For denser fabrics, due to the complexity of processing, slight gathering is provided in the waist area. For light and flowing fabrics, in addition to gathers, different types of folds are made.
Made from cotton
Calculations
Folds
Sewing a skirt with your own hands is not difficult at all, even for novice needlewomen. You just need to correctly calculate your dimensions, material, and then it’s a matter of small things. Since “Tatyanka” is a model with folds, we first need to decide what they will be like:
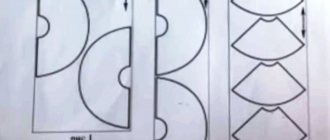
- One-sided. Classic and traditional cut, which is laid in any one direction (most often to the left)
- Counter. As is already clear from the name, the folds go towards each other, starting from the sides.
- Bow ones. They are similar to “counter” folds, but they are made from the middle, leading in different directions.
- Fan. This is an ideal option for creating a three-dimensional model. Since, thanks to the multi-layer application of folds, a very full skirt is obtained.
If you don’t know how to sew a Tatyanka skirt, then I hasten to please you. There is nothing complicated here. To do this, you will only need 2-2.5 hours of free time and desire. First, let's take measurements, you will need:
- Hip circumference (example: 90 cm)
- Waist circumference (example: 65 cm)
- Product length (example: 70 cm)
Next we return to the type of folds. For beginners, it will be easiest to take on single-sided ones. And experienced craftswomen can try more original models. The width of the fold varies on average from 3 cm to 7 cm.
To calculate the number of folds you need:
- Take hip measurements
- Add allowance to them
- And divide by the selected fold width
Example: (OB (hip circumference) + allowance (4 cm)): width of folds (6 cm) = 16 pcs (quantity) or in mathematical form (90 + 4): 6 = 16
The depth of the fold is also calculated using a certain formula: OB * 3 + 4 (allowance) in numbers looks like this: 90 * 3 + 4 = 274
Textile
Each model has its own fabric calculation:
- The skirt is gathered at the waist and with a stitched waistband. So, to the DI (product length) an allowance of 3 cm is added at the waist and another + 10 cm on the back side. It is also worth considering the width of the belt, let's take 9 cm. To sew a Tatyanka skirt with a length of 70 cm and a belt width of 7 cm, you will need to multiply the resulting number by two. Mathematical calculation: (70 + 3 + 10 + 9) * 2 = 184 cm length of fabric. In this case, the width of the fabric should be = 1.45 m.
- Model with elastic band. Formula: DI * 2 + 9 cm (allowance) = 149 cm material length. All this comes from the calculation that the average width of fabric sold in handicraft stores is 1.4 - 1.5 m.
- Model with yoke and pleats. Most often, the volume of a model with folds is approximately 2.5 times greater than OB. Therefore, the formula looks like this: OB * 2.5 + 2 cm (allowance). Mathematical calculation: 90 * 2.5 + 2 = 227 cm. The length is calculated as for a model with a belt.
How to sew a Tatyanka skirt: step-by-step instructions
Sewing technology will change due to the presence of additional parts.
Pattern No. 2
Simple assembly and sewing of the basic model with a belt
To sew a tatyanka skirt, you need to perform the following steps:
- Using an overlocker, process a panel (or two) of the product on the sides and bottom.
- Fold the fabric right side inward and stitch the side from top to bottom, leaving 13-15 cm at the top.
- Gather the panel around the waist. To do this, set the machine to a stitch length of 4-4.5 mm and stitch, retreating 1 cm from the top. On one side, secure the seam, and on the other, pull the thread so that the fabric gathers.
- Glue doublerhide (for thick fabrics) or interlining (for thin fabrics) to the parts of the belt or yoke so that the product does not stretch. For gluing, a part of the belt (or yoke) is cut out and applied with the rough (adhesive) side to the fabric, and a hot iron is passed over it several times.
- The belt is applied with the unglued side to the front side of the fabric and a stitch is given at a distance of 1 cm from the top of the skirt.
- Next, the zipper is sewn on.
- Sew the belt to the product. All gathers and seams are tucked inside, and the top is covered with belt fabric and stitched. In this case, the seam should be placed on the front side of the product along the line of stitching the product to the belt.
- The hem of the skirt is folded and stitched.
You might be interested in: Making a pattern and sewing booties for a small child with your own hands
Pattern No. 3
Tatyanka skirt with elastic band
The previous technology is performed up to step 2 inclusive. So what is next:
At the top of the skirt fabric, a fold is made 0.5 cm larger than the thickness of the existing elastic and stitched from the front side.
Important! When forming the drawstring, the main thing is to remember to leave holes for threading the elastic through.
A pin is attached to the elastic band and threaded through the drawstring. Next, the pin is unfastened, and the ends of the elastic are connected together and stitched.
Tatyanka skirt with elastic band
Additional Information! If there is a wide elastic band (from 3 cm in thickness), the drawstring is not formed until the elastic is stretched over the entire length of the fabric (at the waist) and stitched at a distance of 7-8 mm from the edge of the product. Next, the upper edge of the product is processed with an overlocker. The elastic is wrapped in fabric and stitched along the bottom edge to the product.
On the yoke
How to sew a skirt with a gathered waist? The sewing technology is identical to that described for the model with a belt, with the exception of the peculiarities of the formation of folds on the tatyanka skirt.
Calculation of a product with assemblies:
- V skirt at the hips = Ob+Pb = 95+3=98 cm;
- Number of pleats on skirt = 98/5 = (approximately) 20;
- V products at the waist: From + Fri = 65 + 2 = 67;
- Width of 1 pleat at waist: 67/20 = 3.4 cm.
Technology for sewing a pleated tatyanka skirt:
- Mark folds on all parts of the panel, alternating the depth of the fold and its width;
- Iron the folds and stitch at a distance of 1 cm from the top of the product along the waist line.
- Next, follow the same procedure as in the technology for creating a model with a belt, starting from step 4.
Pattern on the yoke
Pattern and cutting
The skirt pattern is very easy to make, so it is recommended to do it right away on the material:
- Fold the material in half
- Set aside half of OB*1.5 (assembly factor) from the fold. Example: (90 * 1.5) / 2 = 67.5
- At the resulting point, make a notch with scissors
- Draw a line parallel to the fold, making sure to pass through the intended point. (it's best to use chalk when making a pattern on fabric)
- At the bottom, you should set aside the length of the product, not forgetting to add allowances and hems.
- All that remains is to complete the pattern by completing the resulting rectangle
- Cut it out
Next, you will sew a full-fledged “tatyanka” from the rectangle.
Pattern
Sewing a tatyanka and creating its pattern as a whole is not particularly difficult. Even a beginner can model such a skirt.
The second option is to sew elastic to the skirt. The model will emphasize the waist and hide figure imperfections. The measured fabric needs to be folded lengthwise, with the front parts facing each other. From the line along the fold, measure half the circumference of the hips (already multiplied by the fullness factor) and add the amount of allowance.
Since the skirt is sewn from two main fragments (belt and base), there is no need to additionally construct them on paper.
A half-sun skirt with an elastic band is, of course, much easier to sew than with a regular fabric belt. Firstly, we don’t need to cut out an additional part, and secondly, we don’t need to sew on a hidden zipper. But do not forget that to determine the waist radius of the fabric, you should take the half-circumference at the hips (we already talked about this at the beginning of our lesson). This is done so that the skirt fits comfortably.
We sew the lower sections, baste them by 1.5 cm and sew them on the machine. Remove the temporary threads and iron the seams.
We make two wide and two narrow belt loops. We sew the loops to the yoke: wide in the centers, narrow on the sides.
Skirt with elastic
The easiest way to sew a skirt is with an elastic band. It will not take much time and will also be easy to use. Thanks to the elastic band, there is no need to sew in an additional zipper.
1. So, you need to take the cut out pattern - the material.
2. Sew the fabric of the product along the side seam and carefully iron it
3. Fold the fabric from above along the waist line to the width of the drawstring (a strip of fabric into which the elastic will be threaded)
4.The length of the elastic should be equal to OB minus 5-10 cm. However, if you miscalculate, this can always be corrected by tying the elastic or cutting it
5. Fold the bottom of the product to allowance
6. Thread an elastic band
7. Iron the finished product
Some craftswomen like to decorate their products with lace or other materials. You can also use sequins, sparkles and other decor.
Pockets
Sometimes you just want to put your hands somewhere or put something in your pocket. This is why products with pockets are so popular lately. And they are quite simple to make.
Pattern
You will need 4 pieces the size of your palm, for example, mine is 16 cm. You can take a little more to make the pocket more voluminous.
Sewing
1. To prevent the pocket from looking too flashy and out of place, it is best to cut a piece of fabric from the product and make a valance (that is, the visible part of the pocket will be the same fabric). The valance extends approximately 5 cm wide. However, you shouldn’t sew it on all four parts, only two!
2.Take the fabric and place the remaining unchanged parts on it at a distance of 9 cm from the waist line. Sew the pockets, not forgetting about an allowance of 1-1.5 cm. The same needs to be done with the back fabric and the remaining burlap.
3. You need to bend the pockets to allowances along the side seams and iron them.
4. Sew burlap pockets onto the seam allowances that have just been folded back
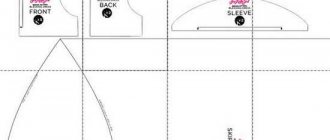
5. Now place the back and front panels on top of each other with the right sides facing in, as shown in the photo below
6. Sew the two parts of the pocket along the side seam, remembering to leave room for the entrance
All that remains is to iron the finished product. And now your product with pockets is ready.
Great, this is just a basic version of the “tatyanka”, but thanks to it you can definitely create an amazing look and wear it anywhere.
How to sew a belt and loops
The belt must first be prepared, glued with adhesive fabric and ironed in half. Then stitch along one of its sides, being careful not to undercut the fabric. Now bend the belt up and fix this position with an iron. Next, all that remains is to make a hem and add a finishing stitch along the front side. But the truth is, first you need to make a ledge for the belt, the area where the button will be sewn. It is small, but requires carefulness. To make a ledge, you simply need to turn the belt inside out at that point (face to face), secure the cut edge, and then turn it back inside out. Straighten the seam with a ruler, fix it with an iron together with a hem, and add a finishing stitch.
If your full skirt will have belt loops, then in this photo you can see the easiest way to make them. And if you need to learn more about the technology of making belt loops, read this article Processing Belt Loops.
How to make a one-piece belt with a wide elastic band for a children's skirt or pants.