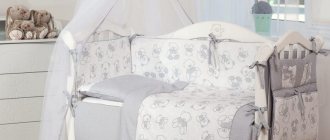
A baby's crib must have protection such as sides. Only they are able to protect the child from drafts and impacts against hard bars. Moreover, you can make such sides yourself, using pattern diagrams and recommendations.
A bumper for a crib is an incredibly practical, and most importantly, necessary thing. This element allows you not only to protect your child from drafts and cold air, but also to soften the child’s impact on hard bars and other parts of the crib.
How to choose fabric for crib bumpers?
To protect such a crib, you need to have a fabric 4 meters long. Choose a dense but natural material that will not cause allergic reactions in the child. In any fabric store you can pick up:
- cotton
- calico
- linen
- chintz
- flannel
IMPORTANT: Before use, wash this fabric in a washing machine and thoroughly iron with steam. This is necessary because natural fabrics tend to shrink.
What are the sides for?
They perform several functions:
- retain heat inside the sleeping place, preventing drafts;
- prevent the child’s limbs from getting stuck between the bars of the crib;
- soften accidental impacts on the crib;
- The patterns on the sides help in the development of the child, and the color scheme promotes emotional development. Read more about the relationship between color and psychological development in the article How to choose bed linen;
- protects toys, rattles, bottles, and pacifiers from falling out. Of course, later the baby will throw them out himself - this will become a kind of “Mommy pick it up” game, but at the initial stage the side will be very helpful;
- If the covers on the backs of the crib have pockets on the outside, then you can store essential items in them: diapers, bottles, powder, cream.
Types of bumpers for a baby crib
Each parent purchases crib bumpers based on their preferences. So, everyone has their own concept of “convenience” and therefore, there are several main types of barriers.
The most common type is the four-sided one, where all 4 sides of the crib are tightly protected around the perimeter, but the half-sided sides hide only the side parts. There are sides of different heights and methods of attaching to the crib: Velcro, ties or fasteners.
IMPORTANT: The fabric of the side also has a developmental function. As the baby grows up, he will certainly examine his environment, so the design on the fabric should not be too cluttered or “heavy.”
Patterns for sides for a baby crib. How much fabric do you need for the sides of the crib?
The process of making a side yourself is not complicated. For standard crib sizes, you will need fabric approximately 55 by 110 cm, as well as appropriate foam rubber. Following clear recommendations, every mother can create the perfect bumper for her baby’s crib.
- Measure the crib to study the dimensions in detail and correctly distribute the fabric for sewing the sides
- Transfer all measurements to a sheet of paper and draw the desired design of the side.
- Cut the fabric into patterns according to your measurements
- Using a sewing machine, stitch all the edges, leaving only one unstitched.
- Measure the foam rubber. Please note that its size should be half a cm smaller than the pattern
- Cut the foam and place it inside the pattern
- Sew edge 4 of each pattern.
- If necessary, decorate the side with ribbons, lace and sew ties
The following patterns will help you visually distribute all stages of work for yourself and understand the structure.
How to calculate the number of products and their sizes
There are recommendations regarding determining the parameter for 1 element depending on the type of soft fencing structure. This makes calculations and presentations easier for beginning needlewomen.
How to make calculations and make a choice:
- If the fence consists of pillows, then you need to make 2 pillows on the headboard and a symmetrical part of the bed. There can be 4-5 pillows on the sides.
- Classic sides consist of only 4 parts, so it is important to know only the length and width of the sides of the crib.
- If you make shaped products, then focus on the quantity and parameters on pillows.
You might be interested in this: The procedure for sewing chevrons onto uniform sleeves
Size according to diagram
Much depends on the shape and dimensions of the sleeping place and crib. Therefore, you first need to take measurements, and only then ask the price for the quantity and size of each element of the soft furnishings. Take measurements from the crib. You need to write down the height, length and width parameters of each piece.
Which crib bumpers are best?
If you decide to make your own protection for your child’s crib, then you should definitely know about the positive and negative properties of each type. So, focusing on the pros and cons, you will decide which crib bumpers are better and which are worse.
- The high side of the crib has a clear advantage, as it effectively protects from drafts and prevents the baby from hitting a hard part. However, it blocks the entire view and the child is forced to observe only the inner area of the crib
- The low side opens up a wide view, giving the baby the opportunity to observe everything that is happening around, but does not prevent injury
- Protections made with fastenings in the form of locks, ties and especially Velcro can tear in situations when the baby reaches to stand up and pulls back the side. Therefore, the option with fasteners is the most reliable. If the side has locks, it will not allow itself to come off and hit the baby against the bars
- If you want to make a bumper with pockets, then a prerequisite is their presence on the outside of the crib. The internal arrangement will constantly attract the baby
- The material used is just as important. Synthetic materials can irritate the skin, so only natural fabrics are recommended. They will allow the product to withstand washing, dry quickly and not lose its shape.
Calculation of the amount of fabric needed for the sides.
Sewing begins with the choice of model, color, pattern, texture and meter of fabric. To determine how much fabric for the sides you need to purchase, simple calculations are made. Every mother knows the size of a baby crib. With its standard parameters 120X60, cushion-shaped sides of 30X30 are usually used, with seam allowance - the side of the cut square will be 34 cm.
You will need 4 pillows on the long side of the crib, and two on the short side. That is, a total of 12 pieces need to be made. If you do not cover one long side of the crib, then sewing 8 pillows is enough.
To figure out how to sew bumpers into a crib, you should first pay attention to the choice of fabric. It should be a material made from natural threads (calico, cotton, chintz). If you decide to make 12 pillows, then you need to cut out a total of 24 squares with a side of 34 cm. With 8 pillows, 16 similar patterns are made.
The standard width of the fabric is 160 cm: therefore, it can accommodate 4 squares with a total length of 136 cm. Having cut out the squares for sewing, the remaining centimeters can be used to decorate ties and smaller pads.
Natural fabric necessarily shrinks during washing; this must be taken into account when cutting.
Tip: the sides will not deform during the entire period of use if the fabric is pre-decatted - that is, washed in hot water and ironed from the inside out.
How much fabric for the sides is needed to beautifully place them in a crib:
1. For 12 pads size 30x30
We need 24 squares measuring 34x34 cm. This number of squares fits into a canvas measuring 136x204 cm
Since the mrcotton.ru store cuts the fabric in multiples of 50 cm, we need a piece 250 cm long
2. For 8 pads size 30x30
You need 16 squares measuring 34x34. This number of squares fits into a fabric measuring 136*136 cm. In the store we buy fabric 150 cm long (if the sides are made in the same color!).
Usually several types of fabric are selected to make the bumper look more original. BUT! It is necessary to take into account that 2 pieces of 34 cm do not fit into 0.5 m of fabric.
Therefore, the layout can look like this: 1. at 204 cm. You need to buy 2.50 m of fabric, taking into account the following layout: 1m + 0.5m + 0.5m + 0.5m; 2. When using 136cm, it is better to take 2m of material. The layout is as follows: 1m + 0.5m + 0.5m.
For internal covers it is necessary to purchase the same amount of fabric as for external ones. Mostly regular white calico is used. It is necessary to take into account that ordinary calico shrinks much more than Polish or Chinese cotton fabrics.
Choose 100% cotton Satin fabric in our online store.
Selection of filler
Before sewing bumpers for a newborn, not only the material, but also the filling is selected. There are various types offered on the modern market:
- padding polyester;
- Holofeybar;
- holcon;
- foam;
- Periotec.
Choose holofiber or synthetic padding filler in our online store.
Most experts recommend using holofiber as a filler for children's products. This synthetic material is elastic and heat-resistant. There are two main types used: printed or plated. For sewing pillows with covers, the most acceptable option is plates. The soft, airy filling is placed inside the covers, and the beautiful fabric on top is fastened with a zipper.
The filler, produced in the form of plates, has a width of 150 cm. This is very convenient - this quantity is divided into 5 squares. No seam allowances or shrinkage allowances are required. To determine the required amount of holofiber, you just need to decide how thick the pillow you would like to make. Typically, holofiber with a density of 300-400 g/m is used for sewing borders. For the entire crib we will need 12 squares.
From 90 centimeters of such filler, 15 squares are made for pillows of standard size 30x30
To fill a pillow with holofiber in balls, an average of 218 g of such filler is used. In this case, the pillow is voluminous, light and soft.
Selection of accessories
Before sewing the sides, it is very important to think about what fittings will be used. To make cushions for bumpers you will need the following types of fittings:
1. Lightning. They will be used for external decorative covers. The number of zippers is the same as the number of pillows. It is better to choose hidden ones, 20-25 cm in size. 2. Ribbons. Satin ribbons 2-2.5 cm wide, as well as dense rapeseed ones, look very nice. This is a great alternative if you don't want to bother with sewing ties. For each pillow you will need 4x2 ribbons.
The outer part of the ribbon is 25 cm, taking into account the allowance for hemming (2 cm) = 27 cm. For 8 pads you need:
0.27cm x 2pcs x 4 corners x 8 pillows. The result is 17.28 m. If you are sewing 12 pads, then you need 26-27 meters of tape.
For high-quality, reliable stitching, you will need threads, the number of which is selected depending on the thickness of the fabric.
Selection of accessories in our online store
Which filler to choose for baby crib bumpers?
Synthetic winterizer and foam rubber are far from the only options for filling the sides. The modern world has many options, different and with their own personal advantages. Namely:
- Foam rubber is a filler, but requires compliance with a number of conditions. For example, thorough and high-quality drying after washing. This material has the ability to retain moisture well, which promotes the development of microbes inside. Has strong wear resistance
- Synthetic winterizer is the best filler for children's bumpers. This material is also not expensive, lightweight, quite elastic, tolerates washing well and dries quickly. Its properties prevent the development of fungus. The main thing when making a side is to sew the padding polyester to prevent it from rolling
- Holofiber is a completely new material, superior in quality to padding polyester. It is completely non-toxic, does not retain moisture, dries quickly and retains its original shape. Thanks to its spiral structure, holofiber is very wear-resistant. Does not cause allergies
- Periotec is a bulky modern fiber. Its main advantage is hypoallergenicity. This is a very elastic synthetic filling material
- Hollcon is a synthetic material with incredible heat-resistant properties. Absolutely non-allergenic, elastic and wear-resistant
- Polyester is a hollow fiber. Has anti-allergenic properties. In no situation does it lose its original shape. Does not absorb water or odors
What beautiful bumpers can you sew into a baby crib with your own hands?
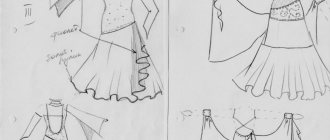
How to sew high sides for a crib?
- Make four patterns of 43 by 63 cm (3 cm is the indentation, i.e. 1.5 cm on each side)
- Make four patterns of 43 by 123 cm
- For ruffles, pieces of fabric up to 15 cm wide and up to 1 m 80 cm long are useful.
- Cut the filling (sintepon) according to the size of the pattern
- Prepare strips for frills in advance and iron them. Use your fingers to form folds on the patterns and, inserting the frill, sew three sides.
- Having inserted the padding polyester into the pattern, stitch the fourth side
- Sew ties to all parts of the sides
How to sew a book border into a crib?
- Prepare the fabric according to the dimensions of your bed and baste the patterns
- Fill the patterns with padding polyester and sew on a sewing machine
- Sew ties and decorative elements
Manufacturing process
Before stitching the bumper elements, you need to make ruffles. To make them beautiful, you need to adhere to certain rules when making them.
The ruffle strips are folded in half with the right side facing inward and stitched along the edges using a sewing machine.
- Fold the ruffle strips in half with the right sides facing inward and stitch along the edges using a sewing machine. Turn the products outward, straighten the corners. Iron the resulting blanks with an iron.
- Use your fingers to form equal folds on the strips and secure them with sewing pins. When assembled, the length of the frills should be 120 cm and 60 cm, that is, correspond to the length of the future sides.
- Sew the bottom edge of each element using a sewing machine, thus securing the folds. Remove the pins from the frills. To prevent the threads from fraying from the ruffle, the bottom of the ruffles can be additionally sewn with a zigzag stitch. The frills intended to decorate children's bumpers are ready.
After sewing the ruffles, they begin to make another important element of protection - ties, with the help of which the bumper in the bed will be securely fixed. Each strip of fabric intended for ties must be covered with a zigzag seam on all sides.
You will get long, neat ribbons. If someone doesn’t want to bother with them, then they can be replaced with ready-made tapes or Velcro.
Only after the frills and ties have been prepared can you begin sewing the covers for the sides.
A properly made bumper will relieve a child from rheumatism and provide coziness and comfort.
- Place 2 patterns of each bumper with right sides facing inward. After this, one frill must be laid between the upper parts of all blanks. Then place the ties between the fabric: it will be convenient to tie the protection to the crib if there are 4 ties at the top of each long side and 3 at the bottom. In short sides there should be 3 ties at the top and 2 at the bottom. If there are ties will be less, then the bumpers will sag.
- In order for the ruffles and ties to be securely fixed between the fabric, the resulting blanks must be pinned together with sewing pins. Sew the fabric with straight seams on all sides, leaving a small hole at the bottom (about 25 cm) through which the filling can be inserted. Additionally, the edges of the products can be stitched with a zigzag seam. The finished covers must be turned outward through the hole left and the corners straightened. You should get 4 sides - 2 long (40x120 cm) and 2 short (40x60 cm) with ruffles and ties attached to them.
- Iron each cover and then fill it with padding polyester or holofiber. To do this, insert the pre-prepared filler through the holes into the sides and carefully level it. Sew the bottom of each piece on the outside with a straight stitch.
- If padding polyester was used as a filler, then each bumper in the crib must be additionally quilted around the perimeter at a distance of 4-5 cm from the edges, securely securing the insulation in it. Long sides can be quilted in the middle - this will provide the padding polyester with additional support.
At this point, making a bumper for a children's bed can be considered complete. All that remains is to tie its parts to the bed, and the baby will no longer be able to hit his head on the crossbar and will be deprived of the opportunity to stick his legs and arms through the bars of his sleeping place. Caring for homemade protective edges is very simple: they need to be washed and ironed regularly. A properly made homemade bumper for a crib will help avoid childhood injuries and make your baby’s rest cozy and comfortable.
How to sew short sides for a crib?
When following the sewing recommendations in our article, carry out the work following the patterns.