How to care
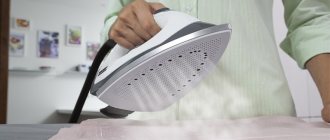
Cleaning. To destroy germs and remove dirt, once every 2-3 months the pillow must be dry cleaned or washed if the care rules allow. People with excessive sweating are advised to do this more often. You definitely need to clean your pillow after an illness.
Ventilation. It is useful to “fill the pillow with oxygen”: fluff it up every day before bed, and take it out into the fresh air once a week - a couple of hours is enough. Frost and sun kill harmful bacteria and refresh the filler.
Replacement. No matter how much you care for your pillow, sooner or later you will have to find a replacement. The average service life of a pillow is 2-4 years, depending on the quality of the filling. Pillows made of wool deteriorate most quickly - after just a year, the filling may become matted and the pillow will lose its elasticity. Natural plant fillers last about two years. Down and feather pillows are more durable. Synthetic fillers will last the longest: on average 5-7 years, although polyester may lose its shape and elasticity after 2-3 years. Long-living record-breaking pillows are made of rubber and latex, lasting up to 10 years.
Pillows of simple shapes
By simple handmade pillows we mean those that have a more or less standard shape, usually square or rectangular. They are not burdened with complex decor and an abundance of small details. To make them, we will not need detailed patterns.
"Bright pillows"
We will move from simple to complex. First, let's look at how to make pillowcases in the most basic way, and then look at more complex examples. If you do not set yourself the goal of creating an exclusive pillow from expensive fabric, but want to place as many pillows of the same type on the sofa as possible, you need to figure out how to save yourself time and money. Do you want to get by with a minimum of materials and the simplest patterns? We will teach you how to do this - watch detailed master classes from apartment design gurus!
"You will need"
1. Sewing machine.2. The device for cutting fabric is traditionally scissors, but there are also more advanced mechanisms. In this case, it is convenient to use a roller knife.3. Iron and ironing board.4. Fabrics. Some designers use a little trick that will save you a lot of money in the long run. Use the most expensive and beautiful fabric only on the front side of the pillow; on the back, you can use simpler material.5. Stuffing material.
A tip that will allow you to reduce the amount of fabric is to leave allowances of about 2-3 cm, no more. A homemade decorative pillow will be stuffed really tightly without looking sloppy. Then you need to mark the places where the corners will be located and sew two pieces of fabric along the contour, leaving a place where the filler will be placed.
"Pillows with inscriptions"
If you are making sofa cushions, and not those you are going to sleep on, then there is little limiting you in the way you treat the surface. For example, you could use markers to create a typographic design on your pillowcase. Of course, the inscriptions should be pre-applied with a pencil in order to correctly calculate the composition. If you are not confident in the beauty of your handwriting, then type the text in a beautiful font in advance. Print the image and transfer it to fabric. Then trace the lines with a special marker for textiles, which will not fade even after numerous washes.
"Knitted pillows"
For those who consider knitting needles and a ball of yarn an outlet and an opportunity to have a good evening, we can recommend spending time and making knitted pillows. You can find many patterns for knitting techniques, both for smooth and ornamental products.
"Pillows made of knitted things"
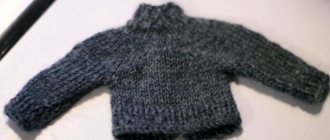
There is good news for those who don’t like or don’t know how to knit! You can give a thick sweater a second life by creating a DIY winter version of your favorite pillow. All you have to do is cut a “pocket” out of the sweater to fit the pillow. Afterwards, hem the edges so that they do not fray, and attach two large buttons to the structure. These pillows look very cute and cozy, creating an incredibly colorful atmosphere of a Swiss chalet in the room.
Fluff your pillow before bed
Sometimes you wake up in bed in the morning, and it’s so warm and cozy that you don’t want to get up at all. And sometimes you don’t get much sleep, but wake up unusually cheerful and rested, so much so that you seem ready to conquer the whole world!
But there are days when no amount of sleep attempts help cope with the feeling of tiredness and tiredness. Everything around is painted in gray colors, and every action is given with great difficulty.
What is the secret to perfect sleep?
To paraphrase a well-known expression, it’s all in the details. When you wake up easily in the morning, feeling cheerful and rested, this is the result of minor, but very important little things. For you, we have selected five main ideas that will help you take these little things into account and become at least five steps closer to ideal sleep.
After an active day, our body needs to “recharge.” For complete recovery, 7 to 8 hours of continuous sleep is enough. The key word here is continuous. 4 hours of sleep at night and 4 hours of sleep during the day after lunch will not give the same effect as a full night's sleep.
By making it a rule to sleep 7-8 hours every night, you will very soon feel an improvement in your well-being and a surge of good mood.
2. About the importance of fresh air.
Ventilating your bedroom before going to bed is very important. If the room is well ventilated, then sleep comes faster and you feel better in the morning. In addition, regular ventilation allows you to rid the bedroom of various bacteria that accumulate in stagnant air.
How to make a pillow with your own hands step by step instructions
How to sew a pillow for a sofa with your own hands? We get an idea or take our own, select tools, fabric, padding and get down to business!
How to sew an original fancy-shaped pillow with your own hands
If the form is not simple, then it will take more time to create a good thing.
Why not? We bring to your attention a detailed master class.
| Illustration | Description of action |
| For work you need such patterns. | |
| We prepare a set of patterns using patterns. There should be 6 circles of each diameter. | |
| The core will require these parts. The edges of the strips are rounded. | |
| We make a petal from two fabrics, trim the edge with bias tape, but leave a hole at the end for stuffing. | |
| We put padding polyester inside, sew the edge with a hidden seam and form a petal with thread and needle. | |
| We sew all the petals one by one onto the base. | |
| Lastly, we sew a long petal twisted around itself into the middle. |
How to create a decorative pillow with applique
Let's remember our childhood, when we created masterpieces from the remains of colored paper. It’s the same with appliqué on a pillow: we take scraps of any fabrics suitable for the design, tape for appliqués on fabrics, fabric for a pillowcase and tailor’s tools.
The instructions for use are simple:
- First, the composition is placed and, when the design takes on its final form, the flaps are glued to the base using a hot iron.
- Then the blanks of the required shape are cut out with scissors. Let's try to cut out the leaves and trunk of the tree.
- Remove the paper backing of the tape and place the blanks on one side of the future pillowcase.
- The application is fixed using a heated iron. Now all the elements need to be stitched with a sewing machine, retreating 2-3 mm from the edge, using any seam.
We sew the pillowcase from the back and front sides, and then put the product on the pillow.
How to make a decorative pillow in shabby chic style
The shabby chic style (literally “shabby chic”) is associated with romantic feelings and retro memories. To fully immerse yourself in the image, linen, cotton, and silk are used.
As a print, you should take flowers, pastoral, angels, birds, butterflies. The pillow is decorated in shabby chic style with lace, frills, voluminous fabric flowers, ribbons, and embroidery.
To work you will need filler, fabric and a tailor's kit. The shape of the future cushion is cut out of the fabric according to the pattern and separately strips with a processed edge for the flounce. First, the flounce is sewn to the front side, and then the back and front sides are sewn from the wrong side. Once the filler is inside, the edges of the product are sewn together.
How to knit a decorative pillow
If you really want to work with knitting needles, then here’s an idea for you.
Here's a diagram for you.
This product serves more as a cover than as a base for a pillow.
How to sew a pillow in the shape of a bolster
The cushion under the head is very comfortable. How to sew a bolster pillow with your own hands? Patterns will help!
We sew the rectangle into a ring, not forgetting about the drawstring around the edge if the pillow is in the shape of a candy. Then insert the cord into the drawstring.
How to sew a decorative baby pillow
A children's room will look more fun if it contains toy pillows. These non-standard shaped products, sewn by caring hands, will become simply faithful friends to the child.
Handmade children's pillow in the form of a toy
To inspire you to create a miracle for your child, we suggest viewing a small gallery of toy pillows.
Fur, an old sweater, felt, flannel, plush can be used.
You can draw your own sketch as a pattern, or take a ready-made one from the master class. Suitable fabrics include fleece and felt for the face:
- Templates of all parts are transferred to the fabric and cut out taking into account the seam allowance. The body consists of a rectangle, and the front and back parts are made of circles.
- The parts are sewn from the wrong side, starting with the cat's ears.
- The ears are sewn in and all the seams are machine sewn. Leave a hole at the bottom for stuffing.
- The muzzle can be drawn with acrylic paint, waterproof felt-tip pens, or sewn on felt parts.
Article
Not only expensive designer items can bring comfort to any home. Homemade interior items can also bring attractiveness and comfort. All kinds of home textiles can be made with your own hands without much effort, and they will look very stylish and aesthetically pleasing. So how to sew a pillow and what is required for this?
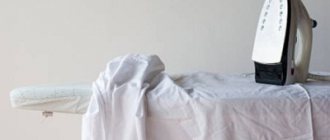
How to fluff padding polyester in a pillow after washing
Sometimes it is not possible to maintain the appearance of a pillow, despite all efforts. In addition, even if you wash the synthetic padding polyester very carefully, it will still wrinkle and cake inside the product, albeit to a slight extent. Therefore, after washing, the synthetic winterizer must be fluffed until it returns to its original state.
We recommend reading: How to remove slime from a sofa: how to remove it, how to remove marks from the upholstery
If the deformation is minor, then you can fluff the filler with your hands - just gently beat the completely dry pillow. You can also walk over the damp surface of the pillow with a vacuum cleaner with a clean attachment; if the lumps of padding polyester are not too dense, then the vacuum cleaner will help break them up.
In extreme cases, the pillow will have to be ripped apart, the stuffing adjusted manually and the product sewn up again. But it makes sense to do this only if the stuffing after washing has become very wrinkled and requires returning to its original state.
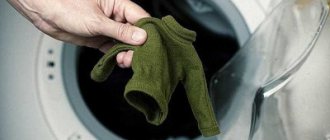
How to wash a synthetic padding pillow
Although padding polyester is a rather sensitive material, it can be washed either manually or in an automatic machine. In both cases, you can achieve a high-quality result without damaging the packing itself.
We recommend reading: How to lighten jeans white: evenly, without boiling
How to wash a synthetic padding pillow in a washing machine
The idea of washing bedding automatically is the most attractive because it reduces all the effort to a minimum. You can wash padding polyester in an automatic washing machine without harming the product, the main thing is to adhere to the proven algorithm and not break the basic rules.
You can wash the product automatically as follows:
- The product is thoroughly watered with cool water to completely wet the padding polyester.
- The bedding is placed in the drum either in a pillowcase or in a special thin bag for washing sensitive items.
- Liquid detergent is poured into the powder cuvette; before doing this, it is important to check and, if necessary, clean the cuvette so that there are no traces of bleach or residues of regular powder left in it.
- The machine is set to delicate or hand wash mode, and the water temperature is set to no higher than 40 °C.
It is also necessary to turn off the spin cycle, and set the speed to the minimum during the wash itself - no more than 500.
When the wash is completed, the machine will need to be run again in the rinse mode without detergent. This will allow you to effectively rid the synthetic winterizer of any remaining cleaning gel. The washed bedding is wrung out over the bath by hand, without much effort, and left to dry.
Advice! If you wash an item once with the spin cycle on, it will not damage the padding made of padding polyester if the item itself is new enough. However, it is better to turn off the spin completely in order to extend the life of the product, especially since even an automatic spin will not be able to remove residual moisture from the padding polyester.
How to wash a synthetic padding pillow by hand
Sometimes padding polyester bedding turns out to be too large for the machine drum, or the product is simply too old, and machine washing is a concern. In this case, you can wash the padding polyester by hand; it’s not that difficult to do.
You can wash the accessory by hand as follows:
- Warm water is poured into a large basin, not hotter than 40 ° C;
- dilute a small amount of liquid detergent in water and mix it, being careful not to foam;
- The pre-wetted item is immersed in water and left for 15 minutes;
- after this, the product is removed from the synthetic padding polyester and wrung out with gentle movements - the item cannot be twisted;
- Pour clean warm water into the basin and rinse the item thoroughly - if necessary, change the water several times until it becomes absolutely clean.
Attention! With this method, it is especially important to wash the pillow at least 1-2 times a year. Since you need to wash and wring out the item with your hands very carefully, it is advisable that the item is not too dirty by the time of washing.
How to sew a pillow on a sofa with your own hands: ideas and technology
You can find a lot of information and master classes on this topic on the Internet. Let's look at some original ideas for creating a pillow with your own hands.
Regular rectangular sofa cushion
In order to sew it, you will need:
- Cotton fabric.
- Filler (sintepon or holofiber).
- Scissors.
- Sewing machine.
- Ribbons, buttons.
Let's start creating:
- Cut out four symmetrical pieces of cotton material.
- We sew them together using a sewing machine, leaving one part unstitched. Be sure to sew the wrong sides of the fabric.
- We fill the base with filler, first turning it right side out.
- Using a sewing machine, sew the hole for the stuffing.
- We decorate the pillow with buttons and ribbon bows.
Important! You can use buttons to make eyes, and use organza ribbons to make strands of hair and sponges.
We sew three-dimensional letters
You will need the following tools and materials:
- Cardboard.
- Scissors.
- Pencil.
- Textile.
- Sewing machine or needle and thread.
- Filler.
Important! You can sew toy animals using the same principle, having previously prepared the pattern and decorating parts.
Let's get started:
- We write a letter on a cardboard sheet and cut it out with scissors.
- Apply the resulting stencil to the fabric and cut out two identical parts.
- We sew them by hand or on a sewing machine from the wrong side, leaving a hole for stuffing.
- We fill the finished base of the product with filler.
- Sew up the hole for stuffing.
Important! You can decorate the pillow with beautiful embroidery, beads or ribbon bows.
Pillow made from scraps of fabric
Sewing it is a little more difficult than previous options. For the creative process you will need:
- Scissors.
- Multi-colored fabric scraps.
- Sewing machine.
- Pillow filler.
Let's start creating:
- We sew the scraps of fabric together (you will need four symmetrical pieces of scraps).
- We sew the resulting pieces together from the wrong side, leaving space for the filler.
- We turn the base inside out and stuff it with foam rubber or synthetic padding.
- Sew the hole for the filler.
- We decorate the pillow with small bows made of satin ribbons at the junctions of the patches (preferably in the corners).
Important! Such a decorative element will look very beautiful in the kitchen or living room.
Making a pillow with your own hands is not that difficult if you have patience and all the necessary tools. And if you watch several video tutorials, the creative process can take a maximum of an hour.
There was a time when every home had feather or down pillows. Today they have not lost their popularity, but they have many competitors. All fillers have their advantages, but there are also some disadvantages. You can compare some materials and find out which one is better.
Conventionally, all fillers can be divided into two large groups: artificial and natural. Each of them has its own advantages and disadvantages.
How to sew a pillowcase on a sofa cushion
Interesting DIY handicrafts for the home TOP of the most original ideas
To sew pillowcases for sofa cushions from fabric that will be on the outside, you need to cut out slightly larger square pieces. The base was 45x45 cm, which means the removable cover was 46x46 centimeters. A case that is too small will not fit on a bag filled with filler or will make it hard. It is best to cut out the main parts (sides of cushions for the sofa) from different fabrics: a pattern, texture on one side will make it the front, a simpler material on the other will make it the back. Don't forget to leave seam allowances of 1-1.5 cm.
The sequence of making a pillowcase is similar to the process of working on a pillowcase:
- Place the cut out pieces facing inward.
- Pin together (photo).
- Machine stitch around the perimeter on three sides. For strength, it is recommended to make 2-3 lines.
- All seams are ironed.
- Excess fabric is cut off at a distance of at least 3 mm from the seam.
After the product is turned right side out, additional corners are formed. This is done using a needle: the fabric is carefully pulled out to the desired sharpness of the angle:
- The edges of the 4th side are folded inward by 1-1.5 cm and ironed.
- A little piece is inserted into the case, everything is aligned, adjusted to the corners.
- The hole is sewn up manually with a hidden seam.
At the stage of sewing a pillowcase, it can be decorated with braid, scallops, a combined cover, borders, buttons, etc.
When deciding on the decor, the first thing you need to pay attention to is the quality and color of the threads. They must be ideal not only in color, but also in density and thickness.
For example, denim, raincoat fabric requires the use of threads No. 40 (for finishing seams, dense fabrics), calico, flannel, flannel - No. 60 (for linen and lightweight materials), silk, cambric, chintz - No. 80 (for thin fabrics) .
Decorative braid is sewn to the pillowcase from the front side before sewing the 4th side and putting the cover on the pillowcase. This is done manually:
- Decorative ribbons of any width are sewn to each side along the edges of the little thought.
- All decorative elements are attached to the bases (squares) on the front side using a simple seam.
- The pillow is sewn together, with the seams and fastening tapes tucked inside.
- If the braid is not located along the edge, but on one of the bases, you can attach it before the sides of the pillow are sewn.
To decorate borders, squares are cut with a large margin. The width of the margin is equal to the width of the borders plus 2 cm for seam allowances:
- First, borders are sewn along the edge on three sides.
- Next, the cover is turned over.
- The stitching is done according to the size of the thought, also on three sides.
- The finished napkin is inserted into the hole.
- To close it, stitch along the fourth side, slightly retreating from the edge of the thought inserted inside.
- The last part of the border is processed: the edges are folded inward and ironed.
- They are stitched manually with a hidden seam.
A pillow with scallops is made according to a different principle. A festoon is a decorative element, an ornamental strip with a downward-facing pattern in the form of leaves, flowers, stepped teeth, waves. First, all the parts are made, then they are assembled together. Fabric scallops can be jagged, rectangular, or rounded. Plain or contrasting fabrics are used. You will need material for finishing (festoons), a base (squares for covers), a zipper, a compass or glass to draw the edges, and a regular sewing kit.
The work begins with marking the parts:
- Make a pattern. Leave 1-1.5 cm for the seams. Step back enough from the edges of the fabric so that after cutting out the squares there is 10-11 cm left over.
- Cut out the resulting squares. The remaining fabric with the square hole will be used when marking and cutting out the scallops.
- Apply markings for scallops on paper. A glass or compass will help you make smooth and uniform edges. Cut everything out.
- Pin the resulting template with pins along the perimeter to the edges of the fabric remaining from cutting out the squares. Cut according to the design.
After this, he begins processing and grinding the edges of the scallops:
- Place the cut pieces together, facing inward.
- Sew with a machine along the wavy lines (the edges of the scallops).
- Trim the design, at least 3 mm from the seams. Turn face out.
- To align the edges, stitch along all sides of the scallops. This needs to be done from the outside, but very carefully and evenly. Article updated: 05/13/2019